TrixKing | How To Blogger

Pages

  • Home
  • SEO
  • Softwares
  • Games
  • How-Tos
  • Sitemap
Showing posts with label Blogger Widgets. Show all posts

18 May 2013

How to Add Related posts at the end of every Post in Blogger

7 Comments so far
Tweet
Related posts are the most relevant posts which appears at the end of every post published on a blog, it plays an important role to get your reader's to continue reading your other posts.
Related posts can also be referred by suggested posts, For example if your post is about technology, some posts related to technology should appear after every post, depending on algorithms used by widget/plugin you're using the relevant posts are selected after each and every post.
There are two most popular sites who's offering such plugins, one is Link-within and other is nRelate  we have already published how to add nRelate related posts widget to blogger,
Throughout this post we will learn how to add related posts, for this purpose we'll use link within widget, it will work for all blogging platforms, such as blogger, WordPress, etc
Suggested posts are really essential for each and every blog, because it is the only way to get your'r visitors into readers of your blog, what you get is more page views per visitor, it is also useful for your reader's, if they did't got what you'r talking about, they may check your other post, and if they like your current post, they might also want to check your other posts related to current posts, that's why most blog owners write it as You might also like, some peoples write it Related post,
There are numours ways to install related posts plugin or widget on your blog, but here will discuss two of them.

  • Add nrelate related posts to blogger
Related posts for blogger

How to Add Linkwithin Related posts in blogger:

You don't need to have account with linkwithin or to signup, 
Simple go to linkwithin.com
related posts widgets for blogger
You'll see a simple form, fill it with your email, your blog link, on which you want to install the widget/plugin, 
Now select platform, such as blogger, WordPress(self hosted only), typepad or other,
Once you fill the form, then Get widget,
if the text on your blog is light and the background is black then check the box, otherwise don't.
I hope this post is helpful for all newbies to blogging, and you will like it.

Posted by Unknown at Saturday, May 18, 2013 7 comments Email This BlogThis! Share to X Share to Facebook
Labels: Blogger Widgets , How to Blogger

2 Apr 2013

Add New Related Posts Widget/Plugin in Blogger/WordPress

7 Comments so far
Tweet
Are you still using traditional Old related posts plugin/widget on your blog,then stop now and check out this new nRelate related posts widget/Plugin, i am sure you will get impressed by seeing the new features of this new plugin. with SEO (Search engine Optimization) point of view this plugin(called by widget in blogger blogs) work awesome. We Promise!
Let start Over to our today Topic:
Related Posts in Blogs:
Related are the most relevant posts appears at the end of each post in blogs, they play very important role in On Page SEO, as every blogger wants to engage reader with his blog, Some bloggers refer it to "Related post", others refer it by "You might also like", "Other Peoples are reading", "Read This also" etc.
For creating posts in word editor, pick up from these recommended word processor softwares, or you can visit http://www.wordprocessorfree.com/list-of-best-free-word-processor-programs to see all the list.
Throughout this post, i will call it Related Posts.
Related posts are the best tool for content Optimization, nRelate related plugin is designed to give more chances to your content for being clicked and read next.

Features of nRelate Related Post Plugin:

  • Full control to customize and enhance according to your needs
  • Pick up the most relevant posts, Options to control and change according to your Blog niche.
  • Easy to integrate in blogger and WordPress blogs.
  • Up to 6 numbers of posts available to chose from you Blog.
  • Do you want to change the size of thumbnails? Yes, You Can change size to fit at the end of your posts.
  • More flexible, developed by experts,this plugin actually does what you really want from it.
  • Rolling out onto other platforms, such as tumblr ,Drupal, Typepad as well as javascript version available.
  • (Optional)Earn from Your Related Posts by showing other sites ads.
How to Add in Blogger and WordPress:
Step-1: Signup to nRelate. and then Login.
Step-2:- At the Top of homepage, hover your mouse on install and select your Blogging Platform, such as WordPress,Blogger,Tumblr,HubSpot. 
Step-3:- Enter Your Blog URL and submit,Once you submitted,your account will be associated with Your new Blog.
To edit these images try http://www.onlinephotoshop.net suggested.
And you will be redirected to a page,follow instructions to integrate code into your Blog. if not then do step-3 again. 
Managing Settings:
Hover your mouse on Manage Settings and select Your Platform.
Once you selected, a list of your domains will appear, select a blog and customize your widget.
Posted by Unknown at Tuesday, April 02, 2013 7 comments Email This BlogThis! Share to X Share to Facebook
Labels: Blogger Widgets , WordPress Plugins

28 Mar 2013

How to Use Google Plus for Promotion and Traffic

2 Comments so far
Tweet
Google Plus is the rapidly growing social networks run by Google, the world number one Search engine on the web.More than 90 Millions users using Google Plus, thus a great place to increase traffic to websites and blogs after Facebook. Learn how to use Facebook for business and to generate visitors to a website or a blog. if you are running a small business on the web, Google Plus offers free resource to get promote your product. or if you are blogger then it's work great to get traffic to your blog.
In today post we will talk about some of the ways to get traffic to your website and blog.

Get Started with Google Plus:  The Only thing you need for Google Plus account is a Gmail id, haven't yet? Create one Free. Once you create or have Gmail id. you can Login to your Google Plus account with your Gmail username and password. and you will see an awesome look of Google Plus network. Google will use your Gmail profile info for your Google plus profile, however you can add more profile info. Once you are satisfied with your profile, you can add peoples that are of your interest, also tell your friends about your new profile, share it on your Facebook wall, once you got enough circles, then you can use Google Plus social network for promotion and visitors, 

Get Found in Google Search:
Obviously the most important one. if you have a website or a blog, and you want to show your profile picture in Google search, then you need to have a Google Plus profile. Learn how to show your image in Google Search results for you Blog or Website.
Once you complete the steps in that post. then you will have picture in Google search results when someone search for something and Google Pick your post in SERP(Search engine result page). Learn how Google pick website contents and posts. it has a positive effect and thus Google plus giving you an effective way to promote your website and Blog.

Google Plus Pages For business: I assume you have created your Google Plus profile, The next is Google plus pages which is especially for website publishers and bloggers to have a business page for any product.
Create Google Plus Page Free  Google plus page provides more services to manage your business well, to add back to circle your followers as a manager or a customer. According to Google, Google Plus pages are especially made for promotion, with Google Plus pages you can also get your product info or website/blog description in Google search results if the search query is relevant to your Google plus page name.

Google Plus Widgets: Google Plus also provides widgets for bloggers and website admins.
How to Google Plus widgets in Blogger:
  1. Login to your blogger dashboard. 
  2. Select a blog and then click on Layout.
  3. Add a Gadget and you will see different types of widgets offered by Google Blogger.
  4. Drag the gadget where you want it appears.
Add badges in websites:
Get Google Plus badge , customize your widget according to your desire needs and website design and copy paste the code into a page where you want badge appears.
There are two types of badges, one is Google Plus Profile badge which for your own profile, and the other is for Google plus pages, Google plus profile are used for personal use and Pages for promotion and to get traffic to your blog or a website.

How Google Plus button increase traffic: Denoted by +1 ,mostly referred by Recommend to Google, a Plus one button, You can easily add this button into your Blog and websites, Once you add plus one button, then users(visitors) can share your blog post or your website Page on their Google Plus Wall,
Also more chances for your post to be in Google search if a friend submit a query in Google search and his circle shared your post. Got it?
Get Google Plus button for your website, Or if you are using blogger for blogging, then you can easily add Plus button for the gadgets in blogger Layout.
Posted by Unknown at Thursday, March 28, 2013 2 comments Email This BlogThis! Share to X Share to Facebook
Labels: Blogger Widgets , Google , How to Blogger , SEO , Social Media

24 Mar 2013

Create Free Professional Contact Us Form for your Website or Blog

Be the first to comment!
Tweet

Contact Us Forms:

Unlike usual in today post i brought a few sites to create a professional contact Us form for your blog or a website, it is easy to build a contact Me or Contact us form and then integrate it into your website page or in blogger or in a WordPress site. all you have to do is to make form and then copy/paste the code into your site.

Why Contact Forms?

Contact forms are very important for a website or a blog, it is a way that users can give you feedback, if there are some problems in your site they can give feedback, and then once you know the problem then it is easy to fix, also users can give suggestions about your site, it may be the design of your website, or how the site should be designed in order to make it pretty much good, and thus more user friendly.
without Feedback's and suggestions you cannot to build a good website, 
Also if you'r site has decent amount of traffic(visitors) and you want to advertise on your site, then it is very good to link empty advertise banner to your contact form, and thus advertiser can contact you.
for any queries users can use contact me form.
also if you allow guest bloggers to write for your blog, then they can talk with you by using contact forms.
There are a lot of sites that offer free scripts for contact forms.
i will recommend you to use foxyform.com . 
Sites that Offers free contact Us forms scripts:
  • Foxyform.com. in this post we will used this site to make a contact form page.
  • FreeContactForm
  • 123contactform.com

How to add contact form to your website or a blog:

First visit Foxyform, Once the website loaded. follow the below instructions.
Settings: there are options you have to select, the options are required fields that you would like to add it to your contact form. these fields must be filled by the user, otherwise an error will pop to the user.
i will recommend you to select name and email as require fields. as they are enough,but you may select more.
Customizing contact form: Here you can customize your contact form, you can select a background color, font color, font family and font size.
Your email address: This is very important step, you must to do it, is to type your email address to which emails would be sent when user submit the form.
At the bottom of the page, you can see the preview of your contact form.
Finally type the captcha code and hit Create formular. Copy the code.

How to Add to Blogger:

  1. Go to Blogger dashboard, then select pages. 
  2. Click on HTML Tab and paste the code.
  3. Click on the preview, it should work for you, 
  4. if it works for you then publish it, Before you publish you may add other text on the form page, so also take advantage of that, have a look to TrixKing Contact page
How to Add to website:
If you are using web hosting to run your site, then it is easy to integrate the code for your contact form page.
simple add a page, or create a new page, type the basic HTML Tags, 
these are .
<html>
          <head>
<title> Contact us</title>
         </head>
        <body>
Your code here
          <body>
<html> 
Paste the contact form page code inside the body tag and save the page, 
Posted by Unknown at Sunday, March 24, 2013 0 comments Email This BlogThis! Share to X Share to Facebook
Labels: Blogger Tutorials for Newbies to Blogger , Blogger Widgets , How to Blogger

28 Feb 2013

New! Stylish Email Subscription Widget for Blogger blogs

4 Comments so far
Tweet
Google Plus Style Email subscription widget
Google Plus Style Email subscription widget for Blogger blogspot blogs:
Associated with Feed burner by Google which deliver every new post that you publish on your blog.
We have already published Feedburner trick to get more visitors to your blog.  A smart way to deliver only post title to your subscribers.
Google Plus Style or Chrome style widget designed  by Bwidgets.com.

How to Add to Blogger?:
Step-1:Go to Blogger Dashboard and then Layout.
Step-2:Add a Gadget and select html/javascript.
Step-3:Copy and Paste the Below code and Save.
<div class="subscribe_outer">
<div class="subscribe_wrapper">
<p>Subscribe Updates, Its FREE!</p>
<div id="btntEmailsub">
<form class="btntEmailform" target="popupwindow" onsubmit="window.open('http://feedburner.google.com/fb/a/mailverify?uri=TrixKing', 'popupwindow', 'scrollbars=yes,width=600,height=540');return true" method="post" action="http://feedburner.google.com/fb/a/mailverify">
<input type="hidden" value="TrixKing" name="uri">
<input type="hidden" value="en_US" name="loc">
<input class="emailText" type="text" value="Enter your email..." onfocus="if (this.value == " enter="" your="" email...")="" {this.value="" }"="" onblur="if (this.value == " ")="" ;}"="" onclick="value=''"name="email">
<input class="emailButton" type="submit" value="Signup Now!" title="">
</form>
</div>
</div>
</div>
<style>
.subscribe_outer {
    background: url("https://blogger.googleusercontent.com/img/b/R29vZ2xl/AVvXsEhJ8myoImLkyEe23cqMvvu_1X2qLdL0uAB6X7UcnlYzT8iVPSe2t1K72lan6xrA_SVHp01BnwT_ZTdQgciVIXgF1_bjWWYN4qdD9YT1Rr8gpEW55VccTwk4nyU7JE9gVFcDsR745j-vA_E/s1600/color-chronicl.gif") repeat scroll 0 0 transparent;
    margin: 0 -10px;
    padding: 5px 0;
}
.subscribe_wrapper {
    background: url("https://blogger.googleusercontent.com/img/b/R29vZ2xl/AVvXsEhKNDBVOAEmBS1U0SY_ovILKiRbBFJMP66L2S_PcipAzVTsE3RgYtuH2aofhpnT9f7cxAQ0Ct2ofgk__2EX71yyPmybLGRykmwGP6fxI5bHZb6j9z_YRGSKXUGKF8RWK9Uigi5PrDXH4UQ/s1600/pattern-chronicl.png") repeat scroll 0 0 #333333;
    color: #CCCCCC;
    font-size: 15px;
    font-weight:bold;
    line-height: 20px;
    padding: 10px 50px 18px 38px;
}
.emailButton {
    background:#249334;
    border: 0 none;
    border-radius: 4px 4px 4px 4px;
    color: #FFFFFF;
    cursor: pointer;
    font-weight: bold;
    padding: 10px 40px;
    text-shadow: 1px 1px 0 rgba(0, 0, 0, 0.4);
    width: 100%;
}
.emailText {
    background: url("https://blogger.googleusercontent.com/img/b/R29vZ2xl/AVvXsEjTCG3TwD4SK0iCm3hPPQC64W5bXrpvVdIyrXfacd0ItQEYg_HlbbiOdbwOihmtNv_iGLthCthJZnr6FSDlwatlAyIPvIroF58Icx-EENgx2Of9OG8K_MMFHc_RxxRz9PgJ4YQvApiWG8o/s1600/email.png") no-repeat scroll 10px center #FFFFFF;
    border: 0 none;
    border-radius: 4px 4px 4px 4px;
    box-shadow: 0 0 3px rgba(0, 0, 0, 0.05) inset;
    color: #444444;
    padding: 10px 40px;
    margin: 0 0 15px;
    outline: none;
    text-decoration: none;
    width: 70%;
}
input, textarea {
    font-family:'Lora',georgia,serif;
}
.subscribe_wrapper {
    color: #CCCCCC;
    font-size: 14px;
    line-height: 20px;
}
.emailButton {
    width: 300px;
}
.emailButton {
    background: -moz-linear-gradient(center top , #30A146 0%, #249334 100%) repeat scroll 0 0 transparent;
    border: 0 none;
    border-radius: 4px 4px 4px 4px;
    color: #FFFFFF;
    cursor: pointer;
    font-weight: bold;
    padding: 10px 40px;
    text-shadow: 1px 1px 0 rgba(0, 0, 0, 0.4);
    width: 100%;
}
</style><a href="http://TrixKing.blogspot.com">Get This</a>
Customization And Usage:
You can customize this widget in the following ways.
  • Change Text Subscribe to updates! it's free in Line#3 with Your own text if you want.
  • Change Text Enter your Email address in Line#8 . You might want to change it to Hi Dude! Enter your email address. 
  • To change text SignUp Now!. change that text in Line#14.
  • Remember! You must to change Red Text in the above code. i.e TrixKing with your own FeedID.
Posted by Unknown at Thursday, February 28, 2013 4 comments Email This BlogThis! Share to X Share to Facebook
Labels: Blogger Widgets

3 Nov 2012

Stylish Flash Stats Counter Widget For Blogs and website

5 Comments so far
Tweet
Flash Stats Counter

Flash Stats Counter widget for Blogger,wordpress Blog And for A Website:
You can use this stats counter widget code almost in all platforms,such as for forums for any site.
it is a good way to let your users and visitors know about your traffic that are visiting your site.
it is a popular and efficient way to get instant web statistics.
Flash Web counter that you can embedded in your site.
If you need detailed data about your web traffic, With 99counters Flash Stats counter you can create highly customisable counters to go on your website, blog, or social networking profile. The counters you create work the way you want them to. They can be fun to look at or unobtrusive. Most important is that they instantly provide either you or your visitors with highly detailed data. Do you want to know where your visitors come from? 99widgets.com Do you want your visitors to know how many others are there at the same time as them? It is entirely free and designed to work exactly the way you want it to.
just like you are adding other third party code in your wordpress Blog. similarly you can add it.
Features of This Stats Counter:
  • Flags of individual visitor is showing
  • Today Visitors are showing.
  • Total visitors of all the Time are showing.
  • Globe which show a world 

Stats Counter Code

How To Add in Blogger:
  1. Go To Your Blogger Template
  2. Then Click on a selection menu of specific Blog
  3. Then click On Layout
  4. Then Add Gadget where you want the counter appears.
  5. Select html/javascript and Paste The Code.
How To Add in A website.
Go Your html file usually an index.Html.
Paste The code between <body> </body> any where you want the flash counter appear.
Done! 

Posted by Unknown at Saturday, November 03, 2012 5 comments Email This BlogThis! Share to X Share to Facebook
Labels: Blogger Widgets

10 Oct 2012

How to Put Code in a box in Blogger,A JavaScript Box

2 Comments so far
Tweet
Javascript Box to put Your code
Screen Shot of Code Box
Put Code in Box in Blogger: JavaScript Box to Put Your Code in Blogspot Post
You might be thinking that the word box i used may not be the word should i use. however this word is pretty enough good to let you know that of what i am talking about.
if you are a blogger and providing services to the users some widgets codes to copy and paste in their blog. so you are the at the right place to learn and implement it on your blog too.
if you are a web developer you can also customize it to look different and stylish.


How To Put JavaScript Box in Blogger Post:
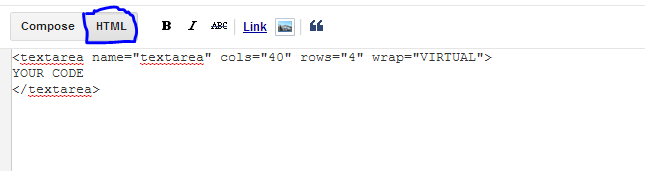
Step-1: Copy the Below Code and Paste it in HTML in Blogger post anywhere you want.
Put Code in a box in blogspot

<textarea name="textarea" cols="40" rows="4" wrap="VIRTUAL">
YOUR CODE 
</textarea>

Step-2: Replace Your Code with your Desired Code.

Now if you Switch to Compose Mode you should see your Code in the Box.
Done!

Customization: 
You can adjust height and width according to your desired by increasing or decreasing the cols and rows in the code provided in the Step-2.

Feel Free to comment and Share your Views!
Thanks to You! You are Amazing


Posted by Unknown at Wednesday, October 10, 2012 2 comments Email This BlogThis! Share to X Share to Facebook
Labels: Blogger Widgets

29 Sept 2012

Scrolling Popular Posts With Thumbnails Widget For blogger

25 Comments so far
Tweet

Popular posts

Scrolling Popular Posts Widget With Thumbnails For blogger:

Scrolling Popular Posts images with some Description and Title is a very Nice way to make your Blog Look stylish as well as user friendly for the user's to pick up a Post and Read!
it also make your blogspot look stylish.
when the images are scrolling it also gives a nice way to attract users to let see it. and more chances for the users to pick up from it their liking post. make your blog better and look professional.
i personally recommend to all blogspot owners.
one feature of this widget is also that it don't reserve more space in your blogspot site.
if you are using the default traditional popular post then it look boring and do not attract the users to let have a time on it.
Another feature of this widget is that it increase the duration of visitors on your blog or on a site.
so feel free to watch demo and decide to add it to your site.

How To Add to Blogger:
Step-1: Go Your Blogger Layout and Add Gadget then Select Popular posts. 
Step-2: Copy the Below Code and Paste it in a Gadget, Html/Javascript.

<style type="text/css" media="screen">
#PopularPosts1 {
 overflow:hidden;
margin-top:5px;
padding:0px 0px;
height:400px;
}
#PopularPosts1 ul {
width:220px;
overflow:hidden;
list-style-type: none;
padding: 0px 0px;
margin:0px 0px;
}
#PopularPosts1 li {
 width:208px;
padding: 5px 5px;
margin:0px 0px 5px 0px;
list-style-type:none;
float:none;
height:80px;
overflow: hidden;
background:#fff url(http://i879.photobucket.com/albums/ab351/bloggerblogimage/blogger/post.jpg) repeat-x;
border:1px solid #ddd;
}
#PopularPosts1 li .item-title {
    color:#A5A9AB;
    font-size:1em;
    margin-bottom:0.5em;
}
#PopularPosts1 li .item-title a {
 text-decoration:none;
color:#4B545B;
font-size:11px;
height:18px;
overflow:hidden;
margin:0px 0px;
padding:0px 0px 2px 0px;
}
#PopularPosts1 li img {
 float:left;
margin-right:5px;
background:#EFEFEF;
border:0;
}
#PopularPosts1 li .item-snippet {
  overflow:hidden;
font-family:Tahoma,Arial,verdana, sans-serif;
font-size:10px;
color:#262B2F;
padding:0px 0px;
margin:0px 0px;
}
#PopularPosts1 .item-snippet a,
#PopularPosts1 .item-snippet a:visited {
    color:#3E4548;
    text-decoration: none;
}
#PopularPosts1 .spyWrapper {
    height: 100%;
    overflow: hidden;
    position: relative;
}
#PopularPosts1 {
 -webkit-border-radius: 5px;
 -moz-border-radius: 5px;
}
.tags span,
.tags a {
 -webkit-border-radius: 8px;
 -moz-border-radius: 8px;
}
a img {
    border: 0;
}
-->
</style>
<script src="http://ajax.googleapis.com/ajax/libs/jquery/1.6.2/jquery.min.js" type="text/javascript"></script>
<script type="text/javascript" charset="utf-8">
$(function () {
    $('.popular-posts ul').simpleSpy();
});
</script>
<script src="http://accordion-for-blogger.googlecode.com/svn/trunk/simplespy.js" type="text/javascript"></script>
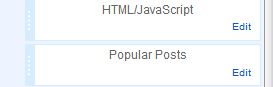
Step-3: Now Look the Below Screen Shot and Make your Popular posts and Html/javascript code arranged like this
popular posts for blogspot

Step-4(optional):
This Step is optional and use as trouble shooting. if your popular posts are not scrolling then do this step, otherwise ignore it.
Add the Below code just before </head>
<script src='https://ajax.googleapis.com/ajax/libs/jquery/1.6.1/jquery.min.js' type='text/javascript'/>
Posted by Unknown at Saturday, September 29, 2012 25 comments Email This BlogThis! Share to X Share to Facebook
Labels: Blogger Widgets

14 Sept 2012

Floating Facebook Like Box widget For Blogger And Website

36 Comments so far
Tweet
Facebook Likebox

Floating Facebook Like Box widget For Blogger:

Floating and scroll to to left Side of Blogger Sidebar Facebook Like Box is very attractive way to get more fans to your facebook Page.
As A Blog Owner You need to promote Your Blog. and for this Facebook Really help you. infact Facebook Fan Page is A great Source to attract Visiters.
Now a days everyone Using Facebook to Promote Blog. and you need some likes means Fans to Share your thoughts and to share your Blog posts.

How it Works:
when Some one Hover Mouse on Facebook then it Move to left side and then Go back to the previous state.
The best thing is that it doesn't hurt the user and also did not reserve place in Your Blog.
if you are Using the Common facebook LikeBox in your Blog. usually it Reserve Space and not good impression.

How To add to blogger:

1. Go to Your Blogger Layout, Add Gadget>Html/javaScript
2.Copy The Below Code and Paste it into a Gadget.
<script type="text/javascript"> //<!--
$(document).ready(function() {$(".w2bslikebox").hover(function() {$(this).stop().animate ({right: "0"}, "medium");}, function() {$(this).stop().animate({right: "-250"}, "medium");},
500);}); //--> </script>
<style type="text/css">
.w2bslikebox{background: url("https://blogger.googleusercontent.com/img/b/R29vZ2xl/AVvXsEhbnUTdhm0khGX5wvo67eDClTaoYuFRoTYoLHRETJAs4_RkeUYPfkdDHVlAVMa2FnJrOAhnZ2wi_Hkztqx7SlVM2ddyF6GP7HdxDDtAFkrT4Qr0EVOa3jLaOmT_d4Tt7n7bmWJB_SPdRDFK/s1600/facebook1.png") no-repeat scroll left center transparent !important;display: block;float: right;height: 270px;padding: 0 5px 0 46px;width: 245px;z-index: 99999;position:fixed;right:-250px;top:20%;}
.w2bslikebox div{border:none;position:relative;display:block;}
.w2bslikebox span{bottom: 10px;font: 9px "lucida grande",tahoma,verdana,arial,sans-serif;position: absolute;right: 6px;text-align: right;z-index: 99999;}
.w2bslikebox span a{color: #FF9D00;text-decoration:none;}
.w2bslikebox span a:hover{text-decoration:underline;}
</style><div class="w2bslikebox" style="">
<div>
<iframe src="http://www.facebook.com/plugins/likebox.php?href=http://www.facebook.com/username&
width=245&colorscheme=light&show_faces=true& connections=8&stream=false&header=false&height=330" scrolling="no" frameborder="0" scrolling="no" style="border: medium none; overflow: hidden; height: 330px; width: 245px;background:#fff;">

</iframe></div>
</div>
<a href="http://TrixKing.blogspot.com" target="_blank">How to Blogger -Freebies-SEO </a>
3. Paste The below Code Just Before </head>

<script src='https://ajax.googleapis.com/ajax/libs/jquery/1.6.1/jquery.min.js' type='text/javascript'/>

Note: ignore Step-3 if you already have this code at Before </head>

How to Add in Website:

  1. copy and paste above html code just above</body>
  2. Also do step no 3 above

Customization And Usage: 
In the Html/Javascript code Replace Username with your Facebook Page User Name.
Replace username with your Facebook Page username
Posted by Unknown at Friday, September 14, 2012 36 comments Email This BlogThis! Share to X Share to Facebook
Labels: Blogger Widgets

13 Sept 2012

Customized Stylish Vertical Menu widget For Blogger

12 Comments so far
Tweet
customized and stylish menu for Blogger

Vertical Menu For Blogger:

By default Blogger offers only Horizontal menu for Blogger. some time you need to have a menu in the sidebar too.
It may be some time because your menu is full at the Top or you want to stylish Your Blog. 
To navigate your users easily to the correct pages or posts. 
There are some posts or some pages which are most popular in your Blog. and you want to have easy way for the user to go to their desired post easily.
In the Sidebar when you have a menu so it look a little different and nice.

How To Add it To Blogger:


1.Go To your Blogger Template>Edit Html>procced and Ctrl+f and search for ]]></b:skin>   Paste the CSS code  just above ]]></b:skin>

    2.  Put HTML code in the Sidebar widget.
i.e. Add gadget then select Html/javaScript and paste the Below Html Code.


Css Code:
          #menu5 ul { list-style: none; margin: 0; padding: 0; } #menu5 img { border: none; } #menu5 { width: 200px; margin: 10px; } #menu5 li a { height: 32px; font-family: Verdana, Arial, Helvetica, sans-serif; margin: 0; font-size: 10pt; font-weight: bold; background: #FFF; height: 24px; text-decoration: none; } #menu5 li a:link, #menu5 li a:visited { color: #FFF; display: block; background: url(https://blogger.googleusercontent.com/img/b/R29vZ2xl/AVvXsEi4uZzPq4CfC14eBFfFMSMggumUaJFVqwEu1DOu1Aj5EuzkhW2Wo5ZKlHGsVpZdjSrA89qdXmq2t_3Tl2JbsioZ6MCZaaBro0Gdtc7vDHWK_l1yU3TpKals1Mf1yPZrCuHC1M5vVncErPU/s800/menu5.gif); padding: 8px 0 0 10px; } #menu5 li a:hover { color: #FFF; background: url(https://blogger.googleusercontent.com/img/b/R29vZ2xl/AVvXsEi4uZzPq4CfC14eBFfFMSMggumUaJFVqwEu1DOu1Aj5EuzkhW2Wo5ZKlHGsVpZdjSrA89qdXmq2t_3Tl2JbsioZ6MCZaaBro0Gdtc7vDHWK_l1yU3TpKals1Mf1yPZrCuHC1M5vVncErPU/s800/menu5.gif) 0 -32px; padding: 8px 0 0 10px; }


HTML Code:
            <div id="menu5">
 <ul>
<li><a href="#1">Link 1</a></li>
<li><a href="#2">Link 2</a></li>
<li><a href="#3">Link 3</a></li>
<li><a href="#4">Link 4</a></li>
<li><a href="http://Trixking.com">How to Blog traffic</a></li>
</ul>
</div>

Customizing Menu:

Now you Done the Step 1 and 2.
Now get ready to customize it and edit it.
You do'nt need to edit/modify the Css code if you don't know much about Css.
You have to edit The Html Code.

The #1 refers to your first link, so paste your Link.
and the Link 1 refers to the text to be appears on the menu!
And So on.
Posted by Unknown at Thursday, September 13, 2012 12 comments Email This BlogThis! Share to X Share to Facebook
Labels: Blogger Widgets

19 Jul 2012

Facebook Like Box Pop up widget for blogger and Website

15 Comments so far
Tweet
Preview
Facebook Like Box PoP up widget for blogger and Website: The Facebook likebox pop of when visiting site or a blog.
Increase your facebook LIkes..widget for blogger.whenever some one visiting your website or Blog, the facebook likebox will pop up..you can see in the above image.
Get the more fans to your fanpage blogger by adding a popup facebook like box to your blogspot.By adding this customized widget may know the visitors to know the number of people like your website and join your site directly.
Facebook likebox is widely used social plugin from Facebook developers. The importance of the Facebook Likebox is tremendous in terms of the number of likes it brings. About 90+ % of the fans that you can get here from the Like box installed on the blog.
Today we'll be sharing the latest Facebook Lightbox style popup widget that you can add to your blogger blog (blogspot)(http://TrixKing.blogspot.com). There are only one simple step to add is quickly.To get this widget follow below procedure:-
Features:
1.) Un-Blockable POP-UP By All Browsers.
2.) POP-UP With LightBox Effect.
3.) Close Button Also Included.
4.) Quick To Load And Easy To Install.
5.) Simple And Stylish Design.

How To Add In Website?
1.) Just Go To Your HTML File.
2.) Now Copy The Below Code And Paste It Between <body> </body>.
3.) Save It, Now You Are Done.

<script src="https://gj37765.googlecode.com/svn/trunk/html/[www.gj37765.blogspot.com]jquery.colorbox-min.js"></script>
<link rel="stylesheet" href="https://gj37765.googlecode.com/svn/trunk/html/%5Bwww.gj37765.blogspot.com%5Dfbpopup.css" type="text/css" />
<script type="text/javascript">
jQuery(document).ready(function(){
if (document.cookie.indexOf('visited=flase') == -1) {
var fifteenDays = 1000*60*60*24*30;
var expires = new Date((new Date()).valueOf() + fifteenDays);
document.cookie = "visited=true;expires=" + expires.toUTCString();
$.colorbox({width:"400px", inline:true, href:"#mdfb"});
}
});
</script>
<div style='display:none'>
<div id='mdfb' style='padding:10px; background:#fff;'>
<h3 class="mdbox-title">
Receive all updates via Facebook. Just Click the Like Button Below<center>
<p style="line-height:3px;" >
?</p>
</center>
</h3>
<center>
<iframe src="//www.facebook.com/plugins/likebox.php?href=http%3A%2F%2Fwww.facebook.com%2FTrixKing.blogspot&width=300&colorscheme=light&show_faces=true&border_color=%23ffffff&stream=false&header=false&height=258" scrolling="no" frameborder="0" style="border:none; overflow:hidden; width:300px; height:258px;" allowtransparency="true"></iframe>
</center>
<p style=" float:right; margin-right:35px; font-size:9px;" >
Powered By <a style=" font-size:9px; color:#3B78CD; text-decoration:none;" href="http://www.TrixKing.blogspot.com">How to Blogger and Freebies</a></p>
</div>
</div>


How To Add In Blogspot?
1.) Go To Your www.blogger.com
2.) Open Your Desire Blog.
3.) Go To Layout.
4.) Click "Add A Gadget" Where You Want To Add It.
5.) Now Scroll To "HTML-JAVASCRIPT"
6.) Click "+" Icon To Add It.
7.) Now Copy The Below Code And Paste It To There.
8.) Leave The Title Empty.
9.) Click Save, Now You Are Done.

Please Note : You must to add the below green code before </head> in order to pop and work.
<script src='https://ajax.googleapis.com/ajax/libs/jquery/1.6.1/jquery.min.js' type='text/javascript'/>
Skip this if you already have this code before </head>

Customization:
1.) Change Red Text According To Your Desire.
2.) Change Blue Text With Your Facebook FanPage URL.
3.) Save And Done.

Like This ?
share it with your friends. any problem comment here.
Thanks to you!

Posted by Unknown at Thursday, July 19, 2012 15 comments Email This BlogThis! Share to X Share to Facebook
Labels: Blogger Widgets
Older Posts

Search

Follow on Google+

Blogger

  • Blogger Widgets
  • How to Blogger
  • Tips and Tricks
  • Free internet phone calls

Like Facebook Page

Powered by Blogger.

Total Pageviews

 
Copyright © 2013 TrixKing | How To Blogger . Designed by Kamran Khan | Privacy policy