TrixKing | How To Blogger

Pages

  • Home
  • SEO
  • Softwares
  • Games
  • How-Tos
  • Sitemap
Showing posts with label Google. Show all posts

21 Aug 2013

How to Add, install And Use Google Web Fonts in Blogger

2 Comments so far
Tweet
Adding Google Web fonts in blogger are now easy with the instruction that are being used in this post. Google provides a lot of free web services among which is Web fonts is another free service.
If you are using the default not custom blogger template, then you may know that you can add or change fonts in the template designer having 20 font styles.
Google offers up-to 500 web fonts to choose from with the verity of styles.
Google say: Using many font styles can slow down your webpage, so only select the font styles that you actually need on your webpage.
Choosing the best web fonts are more important for a blog than a website, because you required to captivate users once he start reading your post.
Compare to WordPress, Blogger has't that much added web fonts.
After observing web fonts at blogs, I came across everyone feel is different for web fonts. you may like some other may not. what you should do? Read a post or an article that using your liking font, if it is nicely to read then add to yours too.
Let's come to the point and add a web fonts to blogger.
I will take an example of Lora web fonts which is available at Google fonts. let's say you want to add it to your blog.


How to Add and install Google Web Fonts in Blogger 

1. Visit Google web fonts. and you will see top fonts being used in websites and blogs, if you like one then click on Add to Collection , but for the purpose of this article, let's say I Like Lora fonts so you I will search the query at the Top-Left side that say 629 font families shown just above the text box and hit enter.
Google web fonts for blogger
Click on Add to Collection and then at the bottom right side click on Use.
A Message will Pop that says You're almost done. Scroll down a bit and Copy the CSS code.
Google web fonts CSS Code

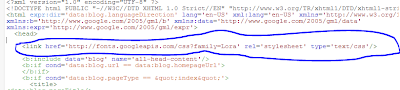
 Paste the CSS One line of code Below <head> Section n your Blogger Template editor. 
blogger Template Head section
You have successfully installed Google Web Fonts in Blogger. Now we need to use it 

How to Use Google Web Fonts in Blogger

It is pretty simple, what you have to do is to replace the font family code -where you want to change with the following.
font-family: 'Lora', serif;
Did't get? Let say you want to change the heading font family to Lora.
Then Go to Blogger Template editor and search for .Post h2 , you will see inside .Post h2 {} Font-family: style;
replace the style with the 'Lora', Serif; and you're done.
Let me Give you an example where I changed Font family.
The Blue Underline code is the CSS styles of H2 Tag for blogger post and you see -next to font family is the style I've added.

Similarly if you want to change for h1,h3, and other HTML Tags then just replace the style that is next to Font-family with the 'Lora',Serif; and you're done.
Posted by Unknown at Wednesday, August 21, 2013 2 comments Email This BlogThis! Share to X Share to Facebook
Labels: Google , How to Blogger

28 Mar 2013

How to Use Google Plus for Promotion and Traffic

2 Comments so far
Tweet
Google Plus is the rapidly growing social networks run by Google, the world number one Search engine on the web.More than 90 Millions users using Google Plus, thus a great place to increase traffic to websites and blogs after Facebook. Learn how to use Facebook for business and to generate visitors to a website or a blog. if you are running a small business on the web, Google Plus offers free resource to get promote your product. or if you are blogger then it's work great to get traffic to your blog.
In today post we will talk about some of the ways to get traffic to your website and blog.

Get Started with Google Plus:  The Only thing you need for Google Plus account is a Gmail id, haven't yet? Create one Free. Once you create or have Gmail id. you can Login to your Google Plus account with your Gmail username and password. and you will see an awesome look of Google Plus network. Google will use your Gmail profile info for your Google plus profile, however you can add more profile info. Once you are satisfied with your profile, you can add peoples that are of your interest, also tell your friends about your new profile, share it on your Facebook wall, once you got enough circles, then you can use Google Plus social network for promotion and visitors, 

Get Found in Google Search:
Obviously the most important one. if you have a website or a blog, and you want to show your profile picture in Google search, then you need to have a Google Plus profile. Learn how to show your image in Google Search results for you Blog or Website.
Once you complete the steps in that post. then you will have picture in Google search results when someone search for something and Google Pick your post in SERP(Search engine result page). Learn how Google pick website contents and posts. it has a positive effect and thus Google plus giving you an effective way to promote your website and Blog.

Google Plus Pages For business: I assume you have created your Google Plus profile, The next is Google plus pages which is especially for website publishers and bloggers to have a business page for any product.
Create Google Plus Page Free  Google plus page provides more services to manage your business well, to add back to circle your followers as a manager or a customer. According to Google, Google Plus pages are especially made for promotion, with Google Plus pages you can also get your product info or website/blog description in Google search results if the search query is relevant to your Google plus page name.

Google Plus Widgets: Google Plus also provides widgets for bloggers and website admins.
How to Google Plus widgets in Blogger:
  1. Login to your blogger dashboard. 
  2. Select a blog and then click on Layout.
  3. Add a Gadget and you will see different types of widgets offered by Google Blogger.
  4. Drag the gadget where you want it appears.
Add badges in websites:
Get Google Plus badge , customize your widget according to your desire needs and website design and copy paste the code into a page where you want badge appears.
There are two types of badges, one is Google Plus Profile badge which for your own profile, and the other is for Google plus pages, Google plus profile are used for personal use and Pages for promotion and to get traffic to your blog or a website.

How Google Plus button increase traffic: Denoted by +1 ,mostly referred by Recommend to Google, a Plus one button, You can easily add this button into your Blog and websites, Once you add plus one button, then users(visitors) can share your blog post or your website Page on their Google Plus Wall,
Also more chances for your post to be in Google search if a friend submit a query in Google search and his circle shared your post. Got it?
Get Google Plus button for your website, Or if you are using blogger for blogging, then you can easily add Plus button for the gadgets in blogger Layout.
Posted by Unknown at Thursday, March 28, 2013 2 comments Email This BlogThis! Share to X Share to Facebook
Labels: Blogger Widgets , Google , How to Blogger , SEO , Social Media

17 Mar 2013

An Ultimate Guide to Google Webmaster Tools

1 Comment so far
Tweet
Google webmaster image
An Introduction to Google Webmaster Tools:
Google webmaster tools are Free tools for webmasters, to improve your site in Google search results. To make your site healthy, to keep Track of your site performance in search results.Google webmaster tools are best place for search engine Optimization (SEO);
webmaster tools also help indexing your site in Google Search(we will learn it in this post.).
with the webmaster tools you can diagnosis your site, get Data about your site and make your site Google friendly.

Get Started to Google Webmaster Tools:

What you need is a Google account or you can say Gmail account. Learn how to Create Google account.
Once you created Google id. then you can sign in to Google Webmaster with your Gmail username and password.
Now the First step you must to do is to Verify your site to in Google webmaster.
Learn how to verify your website in Google Webmaster tools

What you can do with Google Webmasters?

Once you got access to webmaster tools, then there are couple of things you can do in Google webmaster tools.
some of them are illustrated below.
Get Data and Diagnose your Website:
Search Queries:
Search queries help you to find out top queries used in Google Search while your site was in SERP(Search Engine Result Page),
Link To Your site:
Get Data about your site back-links, and how your website data is linked.
Optimize Your Website/Blog:
Submit sitemap to Google in webmaster tools:
Sitemaps are basically the info of your whole website contents. for example your all posts in your Blog. Learn how to submit sitemap to Google .
Remove URLs:
With Google webmaster tools you can remove your website URLs to restrict Google Bot to don't crawl it. it happens in cases you removed a page/post from your blog/website and you don't want user see Not Found Page.
HTML improvements :
To find Out about your posts title Tags, Meta tags and More.
Keywords:
Get list of top keywords used in Google Search, and your site was in Google SERP.

List of other Free Tools that Google Webmaster Offers:
  • Crawl Errors and Stats(Get data about Not found pages of Your site)
  • Google Rich Snippets tools.
  • Fetch as Google.
  • Google Places for Business.
  • Google Merchant Service.
  • Site Performance(Get data about your site Speed)
  • Demoting a Page/Post in Sitelinks(Pages that appear when someone search your site in Google)
  • Get info about index Status.
Posted by Unknown at Sunday, March 17, 2013 1 comments Email This BlogThis! Share to X Share to Facebook
Labels: Google , SEO

6 Mar 2013

How to increase Security of Google Account with 2 Step Verification

5 Comments so far
Tweet
Increase Google account security with 2 step verification
Google Account: simply a Gmail account, which allow you to use all products of Google inc. For example, Gmail for mailing facilities, send mails, receive mails, Blogger for blogging, Google Webmaster tools for webmasters,Google analytics for publishers of blogs and websites,List of all Google free products 
Now you can use every product of google with only one Gmail id.
To access any of the google product, login with your gmail account. Now it's clear your one gmail account is the master of google products.
In this post we will learn how to increase security of Gmail account. so that you are satisfied and secure.

Two-Step Verification: Google introduces 2 step verification, which secure your google account fully to some extent.

What is it?: The question is what is Google 2 steps verification? To login to any product of google, you need Your username/email and password. which is a first step. the second step is Your Mobile. with this extra step you can secure your Gmail account.

How it works?:
Once you activated two step verification, Now whenever you will Login to Google account with your username and password. a new window will pop, and will ask from you an unique code sent to your mobile.
if you have entered the code correct, Google will process it and will redirect you to the web page to which you accessed. Google send everytime a new code, which is unique. and it is as fast as you unlock keypad of your mobile.

How to Activate 2 Steps-Verification?:
Follow the below steps.
Step-1:- Login to Gmail or "sign in" in chrome and click on your profile image at the top left.
Google Account Profile
Now click on Account.
Step-2:
A new page will appear, so click on Security at the left side.
Google Security
Now At the middle of Page click On Settings
A New Page will come, so click On Start
start two step verification

Step-3: This is the final Step; Select your country, and type your mobile number without country code.
Active mobile
Select Text Message(SMS) Or Voice Call, and click on Send Code.Google will send you a verification code. pickup your mobile phone and write code and click on Verify. 
Posted by Unknown at Wednesday, March 06, 2013 5 comments Email This BlogThis! Share to X Share to Facebook
Labels: Google , How To

24 Apr 2012

Verify blog to Google and Bing to access Webmaster Tools

2 Comments so far
Tweet
Verify your blog to Google and Bing so then you can access their webmaster tools, you can manage             sitemaps, sitelinks and other that we will learn in upcoming posts.
   Best practice to use webmaster tools so you can interact with google and bing and let they know about your content means posts.

Verify to Google.


1.you must have Gmail account.
2. Go To Google webmaster Tools
3. sign in.
4. so a list of your blog will you see.
5.Now click on a blog and and verify.
6.choose the verification method of meta tag.
7. copy the code and paste the meta tag code in your html section after <head>.
8. And click verify.
Done!

Verify to Bing:


1.you must have a windows live id.
2. Go To Bing webmaster tools
Same method as verifying to Google.
Posted by Unknown at Tuesday, April 24, 2012 2 comments Email This BlogThis! Share to X Share to Facebook
Labels: Google
Older Posts

Search

Follow on Google+

Blogger

  • Blogger Widgets
  • How to Blogger
  • Tips and Tricks
  • Free internet phone calls

Like Facebook Page

Powered by Blogger.

Total Pageviews

 
Copyright © 2013 TrixKing | How To Blogger . Designed by Kamran Khan | Privacy policy