TrixKing | How To Blogger

Pages

  • Home
  • SEO
  • Softwares
  • Games
  • How-Tos
  • Sitemap
Showing posts with label How to Blogger. Show all posts

11 Aug 2014

Make 5 Minutes Free International Call Worldwide

2 Comments so far
Tweet
It's been a few months a new service is emerged with its variety features for making free international calls word wide, that's correct, to any number in the world.
These services provide you with the demo for making a test call, after you like them you can use the service for unlimited free calls.
As a test call you can make calls for up to 5 minutes to almost any country in the world including united states, united kingdom, india, pakistan, turkey, sri lanka and the list is endless to cover in this post.
free call
Throughout this post we be talking about that new service and how you can use it in order to make calls, by default if you are didn't have any account you can make 1 call a day, if you have one then you can make 2 calls, if you need unlimited calls then try Gmail and make unlimited calls for free.
The service is cross platform, means if you have PC or any other device like laptop it will work, however if you are using android or iphone then use this service to make free calls from pc so you can use the app to make things work for you.

Make 5 Minutes Free International Call

Before we get started make sure you have working mic and headphone, if you have a loptop or some web camera that have this kind of facility will also work.
Use this website for making free international call is http://call2friends.com , simply follow the step by step instructions and you're good to go.
The service is available to almost any country, that's 140 countries, your one will be listed, if not then try our other posts.
Select your country or enter the country code, the flag will appear then enter the remaining number and dial the number, it will take a few seconds to get connected so be patient and wait.
if your call disconnected, you can connect again. 
Posted by Unknown at Monday, August 11, 2014 2 comments Email This BlogThis! Share to X Share to Facebook
Labels: Free Call From PC to Mobile , How To , How to Blogger

9 Oct 2013

Top 10 Grammar check free online tools

Be the first to comment!
Tweet
Grammar checking of your blog posts or of any research paper is important not just for the readers of your blog but also for search engines. Because of the new Humming Bird Google update bloggers are taking care of their contents to be unique and free from spelling mistakes.
web tools for grammar check free
Continue reading to the post:-- 12 Free grammar check online tools click here, grammar check free online tools listed are 12 out of them you can choose a best one for your article scanning.
If you're using WordPress for blogging then I'd recommend you use After the deadline, it is available in plugin form.
After the deadline technology  also offer it's web based app in extension form for Google chrome and Mozilla Firefox.
Feel free to check all of them and choose a best one for your paper. It also includes spell checking features so that if your paper have some spelling errors it will also highlight it.
Grammar checking is the essential parts of any article writing, either you are a freelancer writer, a blogger or have written a research paper for academic purpose.
Posted by Unknown at Wednesday, October 09, 2013 0 comments Email This BlogThis! Share to X Share to Facebook
Labels: How to Blogger

21 Aug 2013

How to Add, install And Use Google Web Fonts in Blogger

2 Comments so far
Tweet
Adding Google Web fonts in blogger are now easy with the instruction that are being used in this post. Google provides a lot of free web services among which is Web fonts is another free service.
If you are using the default not custom blogger template, then you may know that you can add or change fonts in the template designer having 20 font styles.
Google offers up-to 500 web fonts to choose from with the verity of styles.
Google say: Using many font styles can slow down your webpage, so only select the font styles that you actually need on your webpage.
Choosing the best web fonts are more important for a blog than a website, because you required to captivate users once he start reading your post.
Compare to WordPress, Blogger has't that much added web fonts.
After observing web fonts at blogs, I came across everyone feel is different for web fonts. you may like some other may not. what you should do? Read a post or an article that using your liking font, if it is nicely to read then add to yours too.
Let's come to the point and add a web fonts to blogger.
I will take an example of Lora web fonts which is available at Google fonts. let's say you want to add it to your blog.

How to Add and install Google Web Fonts in Blogger 

1. Visit Google web fonts. and you will see top fonts being used in websites and blogs, if you like one then click on Add to Collection , but for the purpose of this article, let's say I Like Lora fonts so you I will search the query at the Top-Left side that say 629 font families shown just above the text box and hit enter.
Google web fonts for blogger
Click on Add to Collection and then at the bottom right side click on Use.
A Message will Pop that says You're almost done. Scroll down a bit and Copy the CSS code.
Google web fonts CSS Code

 Paste the CSS One line of code Below <head> Section n your Blogger Template editor. 
blogger Template Head section
You have successfully installed Google Web Fonts in Blogger. Now we need to use it 

How to Use Google Web Fonts in Blogger

It is pretty simple, what you have to do is to replace the font family code -where you want to change with the following.
font-family: 'Lora', serif;
Did't get? Let say you want to change the heading font family to Lora.
Then Go to Blogger Template editor and search for .Post h2 , you will see inside .Post h2 {} Font-family: style;
replace the style with the 'Lora', Serif; and you're done.
Let me Give you an example where I changed Font family.
The Blue Underline code is the CSS styles of H2 Tag for blogger post and you see -next to font family is the style I've added.

Similarly if you want to change for h1,h3, and other HTML Tags then just replace the style that is next to Font-family with the 'Lora',Serif; and you're done.
Posted by Unknown at Wednesday, August 21, 2013 2 comments Email This BlogThis! Share to X Share to Facebook
Labels: Google , How to Blogger

27 Jul 2013

How to index Blog Posts within Seconds in Google Search

5 Comments so far
Tweet
Search Engines Bots indexing millions of pages daily, the process is on regular basis,  compared to other search engines such as Yahoo, Bing and others- Google allows webmasters to index Blog posts fast by providing tools, Although the process is intelligently own by Google inc, but still we can use some methods to tell Google that our Blog is updated and index new blog post.
Google Indexation of New Blog Posts
The main factors that makes Google to pick up contents and index them in search are Off page SEO Tools, although On Site Optimization are reliable, you can use White Hat SEO Tools to show your website contents in Google Search.
Except your Blog is penalized by Google Panda or Penguin, This post will allow Blog Posts indexed in Google Search quickly within seconds.
Before we use the fast one tool, let's use the common techniques that most of the webmasters and blogger's are using.

Social Media and Social Bookmarking

Use Social bookmarking and Social media sites to share your recent Blog Post, this will help search engines crawl your blog fast, when you share your Blog post on social media sites such as Google Plus, Facebook, Twitter, you'll not just get a some visitors but also get no-follow links. Learn More about Social Bookmarking importance.

Fetch As Google

This is the tool i am using when i publish my new blog post,  Available at Google Webmaster tools under Crawl section.
Simply Enter the URL of your new blog post remove the domain URL and leave the parameter. for example (http://trixking.blogspot.com/2013/07/index-Blog-Post-Fast-in-Google-Search.html) i will remove the domain URL and will leave the remaining URL parameter (bold text is URL Parameter). and fetch as Google, i recommend to submit only URL,  if you did't yet use the Fetch as Google Tool offer by Google Webmaster tools, then i will also suggest to Fetch the Homepage URL and select the Linked Pages and Fetch as Google. you'll see your Blog post indexed within Seconds.
Posted by Unknown at Saturday, July 27, 2013 5 comments Email This BlogThis! Share to X Share to Facebook
Labels: Blogging , How to Blogger

13 Jul 2013

How to Set Custom Permalink for Blogger Post

8 Comments so far
Tweet
Blogger Developer team introduces Custom Permalink for Blogger Posts, which enable bloggers to create custom URLs for their blog posts, it's a most wanted feature announced by Google blogger, that's why now we don't have to concentrate on automatic URLs, and can define by ourself, which is an enhanced feature.
Creating a Custom Permalink for a Blogger Post

What is a Custom Permalink?

Before we define the custom permalink, let's ask ourself what is a Permalink? Permalink is the Permanent URL parameter for a link.
Now custom Permalink means that we can Redfine the URL parameter, and can create a custom one.
For example, the parmalink for this post -on which you're currently landed on is.
http://TrixKing.blogspot.com/2013/07/Custom-Permalink-Blogger-Post
it is not an automatic permalink rather it is defined in the Blogger Post editor.

Custom Permalink importance

Custom permalink is very important for both users and Search Engines, for users it's very easy to remember the full URL for a blog post,  for search engines we bloggers can target a specific keyword,
Without using Custom permalink for blog posts the URL parameter would be long enough and wouldn't be optimize one.

How to Create Custom Permalink?

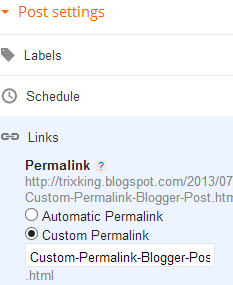
To Set-up or create custom permalink in blogger is now very easy, while writing a post have a look at the right side, you'll see Links , at the permalink option check the radio button that say, Custom Permalink, now type a custom permalink and separate words with dashes (-). once you finish then click on done.
that's it. Note that only dashes are allowed and Blogger won't allow more than 70 characters. No special characters such as spaces, and sing, percent sign etc.

Does Custom Permalink Help?

Custom permalink is an enhanced feature by Google Blogger, and personally i Love it. Now whenever i will write a post, i will give a custom URL parameter (Custom Permalink) to my blogger post and can help readers of my Blog to know on which topic i am talking on. It also help search engines because now we have  an Optimized URL.
Posted by Unknown at Saturday, July 13, 2013 8 comments Email This BlogThis! Share to X Share to Facebook
Labels: How to Blogger

8 Jul 2013

How to Deliver Short Posts to FeedBurner Email Subscribers

2 Comments so far
Tweet
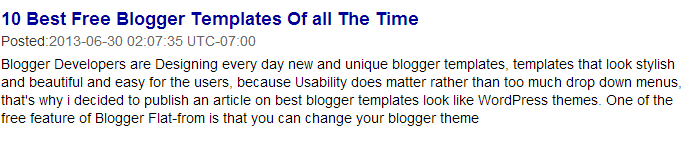
Feedburner is a service owned by Google which allow users to subscribe to Blog Posts, the method is straight forward, simply you make an account with Feedburner. (If you're using Blogger for blogging, then Google Blogger will do it auto for you). Once you integrate email subscription Box (Google Blogger allow you to simply add a Gadget in the Layout area), then whenever your readers signed up to your RSS Feeds via Email subscription form, then they will receive each and every post from your blog when published. But there's a problem, By default your email subscribers are receiving Full Posts, which is not effective in two ways, one for the owner of blog, (Why you're delivering complete post? why not they receive short posts because if they are interested then they will click on post title and will read your post, thus you get visitors from feedburner). Second for subscribers, why they are receiving long posts -what if- they not interested in that post? Short posts contain about 150 characters. actually i had an example of email post, but since i deleted it, Let me show you another example to clear the idea.
An Example of short posts that Feedburner Email subscribers receiving
Did you get? Check Out how your Feedburner posts look.
http://feeds.feedburner.com/User-Name
It is not important that feedburner posts look like that-only short posts. it was just an example to let you know. The important is that your subscribers receive short post whenever you publish a new post.
Let me give you another example, How it will look like, when a subscriber receive short post  via email.

An example of short post received via Feedburner

A Click-able Post title, a short description of your post title.
Follow the below steps to enable it, Users who're subscribed to your Feedburner email feeds will receive only short posts.
Wait a Second, Are you Using WordPress, Drupal or other Flat-from for blogging other than Blogger?
if yes, then Read this,

  • Show only post title and short description in feedburner email feeds
Because the below steps won't work for other platforms, They'll work only for Blogger.
Login to Blogger Dashboard.  Select a Blog and then click on Settings.
Now click on Other at the Left side. and then at the Site Feed : Allow Blog Feed, Select Short.

That's it.

Delivering Short Posts Helps?

Leave me a comment and share your views, what you think about this tutorials, Does it help to get traffic from Feedburner feeds? Because if a subscriber receive short post. i.e. Post title with short description. 
Posted by Unknown at Monday, July 08, 2013 2 comments Email This BlogThis! Share to X Share to Facebook
Labels: How to Blogger

22 Jun 2013

Alexa Ranking and it's Potential Vs Google Page Rank

3 Comments so far
Tweet
All bloggers know well about the Google Page Ranking regarding their site. However most of the people are not well concern on their other methods of ranking. There are number of page rankings in addition to the Google PR. AS an example Yahoo, Alexa are some of very important and well known ranking methods. Therefore I think we must also concern well on
importance of Alexa
Alexa ranking in addition to the Google page ranking.

Potentials of the Alexa ranking:-

We all are much concern on Google ranking. That is because of the usage of ranking in Google search results. But what is the importance of Alexa is also a very important question to think about. According to the new global trends on internet marketing they give there much concern on Alexa even more than the Google PR. The reason for that is the simple ranking system of Alexa. When you get Google rank it is a number from 0 to the 10. It will not give any sense for viewer if they are not well known about the ranking system. But in the Alexa you get a ranking for your site considering all the other web sites in the world. Although it is a simple number from 1 to 10,000,000 or even more, the mechanism of generating the ranking for the site is quite complex. But it is not complex as the Google.
For the building up of the ranking they will consider the mount of traffic that you get, number of backlinks, quality of each backlinks, time in the site like various parameters.
Alexa Google
In addition to the World and the Island ranking of websites It helps users to find out the traffic, geography of the traffic, keyword potential and various other very important details. That may be the reason why the business people likes to consider the Alexa ranking when they are going to get backlinks, advertising area or any other thing in your site. Therefore I suggest all of you to have look on alexa ranking for your site.

Induce the Alexa ranking of a website:

When I got to know that the Alexa-I wanted to have a good ranking on there. But, earlier my rank was about 10,000,000. So I tried to tricks for induce the Alexa ranking. Although there was not adequate amount on how to increase the alexa ranking, I tried some and get my rank up to the 150,000 with in 2 months. So, my experiments are effective and achievable by any person.
There are several number of tricks to increase your Alexa ranking. Even though there are not thousand of tricks they can cause the sudden increase of your Alexa ranking. I have listed some of them in here.
  • Learn How to improve Alexa Ranking Fast

Submit Your site to Alexa:

Normally it takes about 3 months to 6 months for your site getting raked by Alexa. Therefore it is better to submit the site for quick ranking. 

Paid registration:

In the Alexa there are several types of accounts. If you use a premium on you can come to the top soon. Therefore use such if you are really in need of getting good increase in the site ranking. But even with out that I could not get good position. Therefore you also do not even need a premium accounts to good ranking.

Install Script:

For the better traffic data you have to show them how our site works. For that they will ask for you to insert that script. You should insert it between your <head></head> tags.

Alexa Banner:

You can ask insert a Alexa banner with your rank and ask others to review.
Although Google does not give any important of increasing the rank by clicking a banner alexa works so.
And comments about your site in Alexa can cause good ranking to your site.
You may think above methods are not effective. But I know these are the most important tips but also which are being missed. In addition to the above methods you can use lot of other SEO methods to generate good ranking as same as the Google.

Build good number of quality backlinks:

AS all we know there different types of backlinks which may be effective or not. I only likes to build effective ones. That mean the quality baclinks. But how you can do it? I think if you built at least 5 per day in good sites you will 600 backlinks in 1 month.  But that is also not necessary to have. Even 100 – 200 is enough. You can built some backlinks and induce your site.
  • Read : How to Build Backlinks Quickly

Social Media To induce Alexa:

Although social I have not seen great effect on social media with Alexa, it will work to increase your traffic and ultimately the ranking. 

Author Bio:
I'm a Medical Student and Part time blogger. I Love to Write about Alexa Ranking and i mostly write at Blog Tricks.  Write Guest for TrixKing Blog

Posted by Unknown at Saturday, June 22, 2013 3 comments Email This BlogThis! Share to X Share to Facebook
Labels: Blogging , How to Blogger

21 Jun 2013

How to Remove “Deleted Blog Posts” From Feedburner

1 Comment so far
Tweet
Feedburner (RSS Feed) is among free products offered by Google. Which deliver your new posts to the subscribers via email, Post that is just published on your Blog. You can use it on all blogging Platforms. Such as Blogger, WordPress.

Feedburner by Google
You might noticed while landing on this page from a source except navigating from our other post, that why it is important to delete posts from feedburner.
In the upcoming posts we’ll use today’s post method to Fix a Problem of “Not Found Pages” that are showing in Google Web-master tools, even if you mark them as fixed or redirect them to Home.

Why to Delete Posts from Feedburner?

World Wide Web has a common routine that some pages/posts have to be deleted. Some have to be updated and edited. But once you delete them from your site, here we are talking about blogs, especially blogger blogs, then you have to update other services that you’re using that I have updated my Blog and deleted some post -and please update the services. Didn’t get? Suppose you have deleted a post from your blog, and you’re using Google Webmaster tools, Google will show crawl errors, because when Google spider was crawling your Site, it didn't get the deleted posts,  In-fact Google use your XML Sitemap to access pages and posts on your Blog. So you have to tell feedburner that re-sync my feed- means refresh and update my blog feeds.

We’ll talk more about it in the upcoming post, for now let’s come to our topic.

We’ve to update the feed burner and to tell him to refresh the feed.
Login to Google Feedburner with your Google Account Username and Password.
There’ll be a list of your feeds, Select a Feed that you want to resynchronize (Remove Posts that you've deleted from your Blog).
Now At the Top Menu click on Troubleshootize.

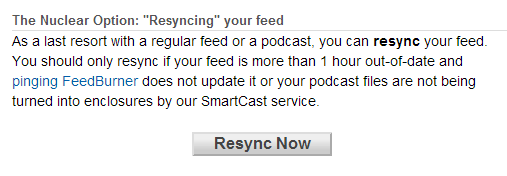
Now scroll down a bit and at the middle of that page click on Resync Now.

At the top of feedburner page you’ll see a message that says “You have successfully Resynchronized: 'Feed Name' ” and if there were some missing posts then they will be automatically deleted.
So now your feedburner contain only that posts that exists on your blog. 
Posted by Unknown at Friday, June 21, 2013 1 comments Email This BlogThis! Share to X Share to Facebook
Labels: How to Blogger

17 Jun 2013

Redirect "Not Found Pages" 404's to a Specific Page

3 Comments so far
Tweet
Not Found Pages are referred by 404, these are the pages which are either deleted/removed by the administrator, or the server can't to find the file path that the user requesting in the URL. Treating with the 404 is very important. Most of the Bloggers treating with them by Creating or Customizing the 404 page. some, redirect to main page or home page. in WordPress Blogs-mostly Blog owners redirect them to sitemap page.
According to Google WebMaster Blog- Not found pages have no effect on your Blog ranking,( Your blog search results), because in world wide web, some pages have to be removed, some have to be edited and is a normal routine. that's why you don't need to be worry about that- but you need to customize the blank page that says 404 Page Not Found.
if you are using Google WebMaster tools, then you might noticed, that Google bot shows the crawl errors (pages that are not found). Pages that did't exist. which hurt Web-masters, in-fact they never hurt your SEO. You need to take proper action on them, because No one want to see just a blank page, that say: page not found.

Redirecting Not Found Pages in Blogger:

Before you just copy and paste codes, i recommend you to read further explanation given in this section.
Go to Blogger Dashboard-then select a Blog-Settings-Search Preference- and then click on Edit at Custom Page Not Found.
Add the Below codes and then Click On Save.
Sorry, the page you are looking for is not found.<script type = "text/javascript">
//Blogger 404 Redirect Powered by TrixKing
BSPNF_redirect = setTimeout(function() {
location.pathname= "/p/sitemap.html"
}, 0);
</script>
The Script will work only if you have created a Sitemap Page in your Blog.
  • Read here:- How to Create Sitemap (Table of Contents) in Blogger
if you want to redirect all not found pages to home page. then replace the code /p/sitemap.html with  / (backslash). 
sitemap.html is a page, so you can specify a page to which you want to redirect all 404's.

Redirecting Not Found Pages in WordPress: 

If you're using WordPress Framework for Blogging, then it's very easy to redirect pages to a specific page.
Here's the code you have to add in 404.PHP File. which will redirect all not found pages to home.
<?php wp_redirect(get_option('home')); ?>
Make sure to Replace all codes in 404.PHP File with that Line Only. otherwise it will give you an error.
Means that -your 404 file will contain only that one Line.
The code will redirect all not found pages to home page. if you don't want that- and want to redirect to other page.then replace home with the desire file name, to which you want to redirect all not found pages.
Posted by Unknown at Monday, June 17, 2013 3 comments Email This BlogThis! Share to X Share to Facebook
Labels: How to Blogger

24 May 2013

How to Create and Add Favicon to Blogger

2 Comments so far
Tweet
Favicon is a tiny image which apppear in the address bar of any website, Google blogger uses a default B image for all blogspot blogs, You can easily change/remove a default favicon and upload a custom one to your  blog. You can use any image (16x16) to use it as a favicon image for your website or blog.
However there are a few sites, which offer you tools to create for yourself, Before you use any image as a favicon, you must to generate an .ico extension from your image, You can design a small image in adobe photoshop or any photo editor, and then convert that image to ico.
Throughout this post we will learn how to create or generate favicon and how to upload it in blogger.

How to create Favicon:

it is very easy to create a favicon(.ico) online, 
Step-1: First of all create a small image for your website, which could be anything, usually it is the the starting name of your website or a simple logo of your site, Once you create, then jump to step2
Step-2: Visit Dynamic Drive and click on choose file, and locate the small image that you have created in step1, and click on Create favicon, your favicon would be generated and you can download as .ico extension.
Now if you're using blogger platform for blogging, then in the second part of this post we will learn how to upload favicon on blogger.

How to add favicon to blogger blog:

Step-1: first of all, login to your blogger dashboard , a list of your blogs will appear, select a blog and click on Layout.
Step-2: Now at the top of your blogger layout, click on Favicon Edit.
favicon settings in blogger
Step-3: A new window will opens, click on remove(if you want to change) Or simply click on Browse, a window will pop, and will bring to your local hardware files, you can locate your favicon(.ico) extention file and finally click on save.
it may take upto 24 hours to take effect, So be patient and wait.
Posted by Unknown at Friday, May 24, 2013 2 comments Email This BlogThis! Share to X Share to Facebook
Labels: How to Blogger

18 May 2013

How to Add Related posts at the end of every Post in Blogger

7 Comments so far
Tweet
Related posts are the most relevant posts which appears at the end of every post published on a blog, it plays an important role to get your reader's to continue reading your other posts.
Related posts can also be referred by suggested posts, For example if your post is about technology, some posts related to technology should appear after every post, depending on algorithms used by widget/plugin you're using the relevant posts are selected after each and every post.
There are two most popular sites who's offering such plugins, one is Link-within and other is nRelate  we have already published how to add nRelate related posts widget to blogger,
Throughout this post we will learn how to add related posts, for this purpose we'll use link within widget, it will work for all blogging platforms, such as blogger, WordPress, etc
Suggested posts are really essential for each and every blog, because it is the only way to get your'r visitors into readers of your blog, what you get is more page views per visitor, it is also useful for your reader's, if they did't got what you'r talking about, they may check your other post, and if they like your current post, they might also want to check your other posts related to current posts, that's why most blog owners write it as You might also like, some peoples write it Related post,
There are numours ways to install related posts plugin or widget on your blog, but here will discuss two of them.

  • Add nrelate related posts to blogger
Related posts for blogger

How to Add Linkwithin Related posts in blogger:

You don't need to have account with linkwithin or to signup, 
Simple go to linkwithin.com
related posts widgets for blogger
You'll see a simple form, fill it with your email, your blog link, on which you want to install the widget/plugin, 
Now select platform, such as blogger, WordPress(self hosted only), typepad or other,
Once you fill the form, then Get widget,
if the text on your blog is light and the background is black then check the box, otherwise don't.
I hope this post is helpful for all newbies to blogging, and you will like it.

Posted by Unknown at Saturday, May 18, 2013 7 comments Email This BlogThis! Share to X Share to Facebook
Labels: Blogger Widgets , How to Blogger

14 May 2013

5 Traffic Generation tips to increase Blog Visitors

6 Comments so far
Tweet
Traffic generation tips
Every blog is successful because it has impression of content to the Google, and if you have a pure and quality contents and want that you blog succeed, you need traffic. The important thing is that you don't need to invest lots of money each and every time, on anything. Traffic is not generated through the money or other spam senders, it is generated by the purity of the content, it requires a little bit hard work, investment and time.
Now below are the 6 best tips to generate the traffic, by going through it you can start generating an average and reasonable traffic to your blog. 

Attract search engine spiders:

To make search engine look for your content you must produce a Search Engine Optimized content for your blog which will not only help you generate a targeted visitors to your but will also increase free organic traffic to your website or blog.You can get tons of traffic from yahoo, Bing or Google as well.  When you are linking the pages within you blog, try to put keywords into hyperlinks to any page, this will help in getting higher rank for that page and could express the page better.

Submit your sites to search engines:  

There are lots of search engine on the internet, but most basic and respected are Bing, Yahoo and Google because majority of the users use these engines,
once you publish you page on these search engines and appear in the top three, your page will automatically ranked higher and published on other search engines as well.
  • Submit your blog to 50 Search engines directories

Comment on related blogs:

Now a days blogging is being done by every single user on the internet, and for there commenting on the blog is being the the best way of getting traffic, but it is not necessary that users will visit your site though your link in the comment box, you need to make your comment according to theme, interesting and informative, as
a user could get it informative and could visit your blog through it, you have to bring beauty in your comments and thus mostly comment on WordPress blogs too.

  • Add Comment Count in blogger to increase comments on your blog

Guest post:

Start writing guest post on others website or blog, which gets higher respect on to the internet, try making back links to your website, mean while you being the guest blogger the owner has a break from writing and still updates the blog and the guest enjoys the exposure of the blog. This is one of these the best way to get tons and tons of traffic and respect on to the internet.

  • Write Guest Post for Us and Get Maximum Exposure

Utilize forums/message board: 

Try to find out and join the forums under you niche matching and start commenting and posting interesting and informative things which includes signature on the post or comment,
which could help you in putting your links in them and people could reach you blog, through that signature but remember that what you post or comment must be interesting and 
informative, otherwise people won't visit your blog.
Author Bio:
Hi, i am Abdul Hanan, a BBA student and Part time blogger, I love to write on Blogging and technology, Follow me on Twitter, Join my Facebook Official Page

Posted by Unknown at Tuesday, May 14, 2013 6 comments Email This BlogThis! Share to X Share to Facebook
Labels: Blogging , How to Blogger , promotion , SEO

14 Apr 2013

Get Started with New Blogger Template HTML Editor

3 Comments so far
Tweet
Blogger developer team recently redesigned and improved the Template HTML editor, which was very most wanted by the designers and developers of blogger ,
Blogger new template html editor
Especially for the developer and designers of Blogger templates it would be very useful, and they can design blogger template in very less time.
If you are using Blogger platform for blogging and have enough knowledge of HTML, css, JavaScript then you can edit your template and can customize according to your needs and liking.
Unlike the Old traditional blogger template editor the new one is improved,different types of colors are used in the code.
For editing your photos use online photoshop recommended.
Have't checked yet. Check out Now.
1.Go to Blogger Dashboard.
2.Select a a Blog and click on Template.
3. Now Click on Edit html. you will surprise, and will see an awesome look,

 New Blogger template HTML editor features:

Jump to widget Feature:
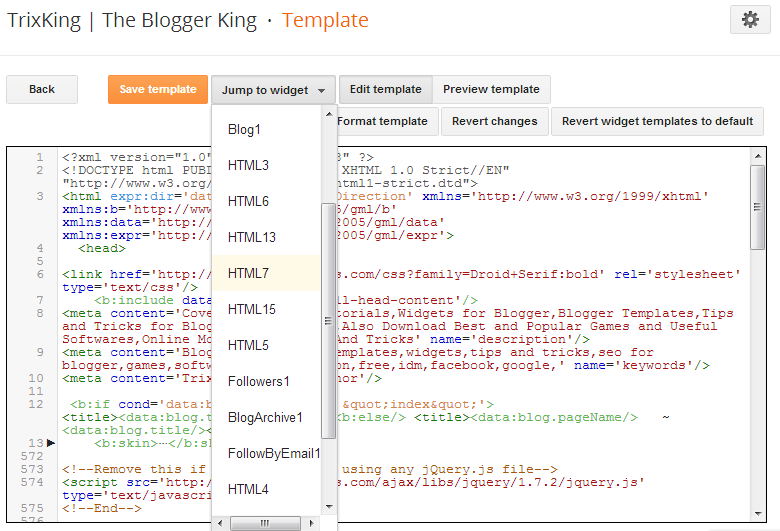
With the new feature of "Jump to widget", you can easily jump to the set of codes of a specific widget, Jump to widget is drop down button,whenever you click on a specific widget, all codes related to that widget would be highlighted.
Line Numbers:
Line numbers are associated with each line, so it is easy to remind bunch of code you want to edit or you have edited a couple minutes ago, and you have forget something and want to edit again. Unlike the Old template editor in which there were no line numbers, and in the previous version whenever template given you a syntax error, then it was very difficult to find the line number.
Expand a widget:
With the new fold marker ►, you can easily expand a specific set of codes related to a specific tag, these are includable tags which expand when you click on fold marker.
indentations:
if you are a web designer you might used Notepad++, Programmer notepad, or Adobe dream viewer etc, in such advance html editors, there are indentations, which separate a block of code. Now the good news is blogger template also offers such friendly tools, and in future may be there's another feature in which you can see suggestions when you start typing.
Revert widget back to default:
Another feature is "Revert widget to default", whenever you do some mistake while customizing your widget, this feature will be help you to revert back to default,

For photo editor, http://Onlinephotoshop.net the URL of online photoshop.

What are your thoughts?
i think this recent improvement in blogger template editor will help every blogger designer, and you will love it, i personally like the different colors used in template code, indentations, and jump to widget tool, which are very helpful and easier for newbie to blogger template. Leave me a comment and share your views.    
Posted by Unknown at Sunday, April 14, 2013 3 comments Email This BlogThis! Share to X Share to Facebook
Labels: blogger buzz , blogger news , Blogger Tutorials for Newbies to Blogger , How to Blogger

28 Mar 2013

How to Use Google Plus for Promotion and Traffic

2 Comments so far
Tweet
Google Plus is the rapidly growing social networks run by Google, the world number one Search engine on the web.More than 90 Millions users using Google Plus, thus a great place to increase traffic to websites and blogs after Facebook. Learn how to use Facebook for business and to generate visitors to a website or a blog. if you are running a small business on the web, Google Plus offers free resource to get promote your product. or if you are blogger then it's work great to get traffic to your blog.
In today post we will talk about some of the ways to get traffic to your website and blog.

Get Started with Google Plus:  The Only thing you need for Google Plus account is a Gmail id, haven't yet? Create one Free. Once you create or have Gmail id. you can Login to your Google Plus account with your Gmail username and password. and you will see an awesome look of Google Plus network. Google will use your Gmail profile info for your Google plus profile, however you can add more profile info. Once you are satisfied with your profile, you can add peoples that are of your interest, also tell your friends about your new profile, share it on your Facebook wall, once you got enough circles, then you can use Google Plus social network for promotion and visitors, 

Get Found in Google Search:
Obviously the most important one. if you have a website or a blog, and you want to show your profile picture in Google search, then you need to have a Google Plus profile. Learn how to show your image in Google Search results for you Blog or Website.
Once you complete the steps in that post. then you will have picture in Google search results when someone search for something and Google Pick your post in SERP(Search engine result page). Learn how Google pick website contents and posts. it has a positive effect and thus Google plus giving you an effective way to promote your website and Blog.

Google Plus Pages For business: I assume you have created your Google Plus profile, The next is Google plus pages which is especially for website publishers and bloggers to have a business page for any product.
Create Google Plus Page Free  Google plus page provides more services to manage your business well, to add back to circle your followers as a manager or a customer. According to Google, Google Plus pages are especially made for promotion, with Google Plus pages you can also get your product info or website/blog description in Google search results if the search query is relevant to your Google plus page name.

Google Plus Widgets: Google Plus also provides widgets for bloggers and website admins.
How to Google Plus widgets in Blogger:
  1. Login to your blogger dashboard. 
  2. Select a blog and then click on Layout.
  3. Add a Gadget and you will see different types of widgets offered by Google Blogger.
  4. Drag the gadget where you want it appears.
Add badges in websites:
Get Google Plus badge , customize your widget according to your desire needs and website design and copy paste the code into a page where you want badge appears.
There are two types of badges, one is Google Plus Profile badge which for your own profile, and the other is for Google plus pages, Google plus profile are used for personal use and Pages for promotion and to get traffic to your blog or a website.

How Google Plus button increase traffic: Denoted by +1 ,mostly referred by Recommend to Google, a Plus one button, You can easily add this button into your Blog and websites, Once you add plus one button, then users(visitors) can share your blog post or your website Page on their Google Plus Wall,
Also more chances for your post to be in Google search if a friend submit a query in Google search and his circle shared your post. Got it?
Get Google Plus button for your website, Or if you are using blogger for blogging, then you can easily add Plus button for the gadgets in blogger Layout.
Posted by Unknown at Thursday, March 28, 2013 2 comments Email This BlogThis! Share to X Share to Facebook
Labels: Blogger Widgets , Google , How to Blogger , SEO , Social Media

24 Mar 2013

Create Free Professional Contact Us Form for your Website or Blog

Be the first to comment!
Tweet

Contact Us Forms:

Unlike usual in today post i brought a few sites to create a professional contact Us form for your blog or a website, it is easy to build a contact Me or Contact us form and then integrate it into your website page or in blogger or in a WordPress site. all you have to do is to make form and then copy/paste the code into your site.

Why Contact Forms?

Contact forms are very important for a website or a blog, it is a way that users can give you feedback, if there are some problems in your site they can give feedback, and then once you know the problem then it is easy to fix, also users can give suggestions about your site, it may be the design of your website, or how the site should be designed in order to make it pretty much good, and thus more user friendly.
without Feedback's and suggestions you cannot to build a good website, 
Also if you'r site has decent amount of traffic(visitors) and you want to advertise on your site, then it is very good to link empty advertise banner to your contact form, and thus advertiser can contact you.
for any queries users can use contact me form.
also if you allow guest bloggers to write for your blog, then they can talk with you by using contact forms.
There are a lot of sites that offer free scripts for contact forms.
i will recommend you to use foxyform.com . 
Sites that Offers free contact Us forms scripts:
  • Foxyform.com. in this post we will used this site to make a contact form page.
  • FreeContactForm
  • 123contactform.com

How to add contact form to your website or a blog:

First visit Foxyform, Once the website loaded. follow the below instructions.
Settings: there are options you have to select, the options are required fields that you would like to add it to your contact form. these fields must be filled by the user, otherwise an error will pop to the user.
i will recommend you to select name and email as require fields. as they are enough,but you may select more.
Customizing contact form: Here you can customize your contact form, you can select a background color, font color, font family and font size.
Your email address: This is very important step, you must to do it, is to type your email address to which emails would be sent when user submit the form.
At the bottom of the page, you can see the preview of your contact form.
Finally type the captcha code and hit Create formular. Copy the code.

How to Add to Blogger:

  1. Go to Blogger dashboard, then select pages. 
  2. Click on HTML Tab and paste the code.
  3. Click on the preview, it should work for you, 
  4. if it works for you then publish it, Before you publish you may add other text on the form page, so also take advantage of that, have a look to TrixKing Contact page
How to Add to website:
If you are using web hosting to run your site, then it is easy to integrate the code for your contact form page.
simple add a page, or create a new page, type the basic HTML Tags, 
these are .
<html>
          <head>
<title> Contact us</title>
         </head>
        <body>
Your code here
          <body>
<html> 
Paste the contact form page code inside the body tag and save the page, 
Posted by Unknown at Sunday, March 24, 2013 0 comments Email This BlogThis! Share to X Share to Facebook
Labels: Blogger Tutorials for Newbies to Blogger , Blogger Widgets , How to Blogger

11 Mar 2013

Smart Ways to Promote Your Website Or Blog

7 Comments so far
Tweet
Promotion of website or A Blog
If you are running an online business or a blogger/website owner, it's essential and critical important for you to promote your website, get more visitors to your website and grow your blog. and thus more traffic and more sales.
We have already published how to promote a website using Facebook.
The world wide web is full of tips and tricks to increase traffic to a website and  blog. However in this post i am going to combine them in smart way, all of them are free to use.

Posting Planning and ideas to get the most out from your post:
You might noticed or heard from one of your friends, sometimes you have an idea to publish an article, but sometimes you get lost it, the good way is to write the title of your article in your mobile drafts or an email draft, Off course you can save as a draft post into your blogging platform dashboard. WordPress or Blogger 
Once you got time to write that article, the first thing is to share your post on all social networks.
As sayings of Pro Blogger's: Give 70% of your blogging time to promotion.

Social Networks and Other Free Services: 

social networks
Blogger's spend their 60% time on social networks, because these are the starting ways to increase traffic to a blog, Despite of these social networks also concentrate on email feeds, Add New Feed-burner email subscription widget to your blogger blog. a smart way to get more visitors from email feeds.
Use Social Media Free Tools to handle sharing for you. An Example Hotsuite.
Other Free Ways:
  • Submit site to search engines directories.
  • Use forums and get traffic and backlinks from them
  • Cooperate with other bloggers and website owners. and do comments on other blogs and websites. especially WordPress Blogs who have enables Comment luv.
  • write and release an eBook.
  • Press Release services, Pr.com i-newswire
  • Guest posting on other Blogs, Get Traffic and backlinks
  • Post an article about your website or product on  wikipedia 

Search Engines-Google is The Best:

Search engines are the best and consistent networks to get the traffic to a website, The best way to submit sitemap to Google and Bing. Use Free Google Webmaster Tools to make your site healthy. connect your Google Plus Profile to your Blog. while writing a post keep search engines in mind.
Posted by Unknown at Monday, March 11, 2013 7 comments Email This BlogThis! Share to X Share to Facebook
Labels: How to Blogger , SEO

23 Feb 2013

Auto Read More For Blogger with Customization

1 Comment so far
Tweet
auto read more blogger
Auto Read More with Thumbnails for Blogger Blogspot Blogs:
Now a days, almost every blogger integrated auto read more system in their blogs, Unlike conventional method in which you can add read more using jump break(single post only), You can change read more text(Go to blogger layout click on edit posts, a window will pop up, change the text). For more details Read Designing and managing posts in blogger 
In Updated auto read more system you can easily integrate for all posts.
Changes in one place will effect on all posts published on your blog.

How to Add to Blogger?
Follow the Below Steps.
Step-1:-Go to Blogger Template then Edit html, click on Proceed.
Step-2:- At the Top left Tick the Expand widget Box.
Step-3:- Search for <data:post.body/>
Step-4:-Replace the above code with the Below codes.

<b:if cond='data:blog.pageType == "static_page"'>
<data:post.body/>
<b:else/>
<b:if cond='data:blog.pageType != "item"'>
<div expr:id='"summary" + data:post.id'><data:post.body/></div>
<script type='text/javascript'>createSummaryAndThumb("summary<data:post.id/>");
</script> <span class='rmlink' style='float:right;padding-top:20px;'><a expr:href='data:post.url'>Read more...</a></span>
</b:if>
<b:if cond='data:blog.pageType == "item"'><data:post.body/></b:if>
</b:if>
Step-5:- Now Search for </head> and paste the below code just Above </head>

<script type='text/javascript'>var thumbnail_mode = "no-float" ;
summary_noimg = 430;
summary_img = 340;
img_thumb_height = 100;
img_thumb_width = 120;
</script>
<script type='text/javascript'>
//<![CDATA[
function removeHtmlTag(strx,chop){
if(strx.indexOf("<")!=-1)
{
var s = strx.split("<");
for(var i=0;i<s.length;i++){
if(s[i].indexOf(">")!=-1){
s[i] = s[i].substring(s[i].indexOf(">")+1,s[i].length);
}
}
strx = s.join("");
}
chop = (chop < strx.length-1) ? chop : strx.length-2;
while(strx.charAt(chop-1)!=' ' && strx.indexOf(' ',chop)!=-1) chop++;
strx = strx.substring(0,chop-1);
return strx+'...';
}
function createSummaryAndThumb(pID){
var div = document.getElementById(pID);
var imgtag = "";
var img = div.getElementsByTagName("img");
var summ = summary_noimg;
if(img.length>=1) {
imgtag = '<span style="float:left; padding:0px 10px 5px 0px;"><img src="'+img[0].src+'" width="'+img_thumb_width+'px" height="'+img_thumb_height+'px"/></span>';
summ = summary_img;
}
var summary = imgtag + '<div>' + removeHtmlTag(div.innerHTML,summ) + '</div>';
div.innerHTML = summary;
}
//]]>
</script>

 Step-6:- Now click on Preview to check. If it work fine for you. then Save Template.

Customization :- You can customize the read more style according to your desire needs and to adjust better look for your posts. You can do changes in step-5 codes.
Line#2: To change value 430, Refer to the number of characters if there are no image in the post.
Line#3:-To change value 340, Refer to the number of characters if there is image in the post.
Line#4: To change value 100, if you want to increase or decrease height of the image.
Line#5: To change value 200, if you want to increase or decrease width of image.
Posted by Unknown at Saturday, February 23, 2013 1 comments Email This BlogThis! Share to X Share to Facebook
Labels: How to Blogger

21 Feb 2013

How To Display Only Post Title in Feedburner email Feeds

5 Comments so far
Tweet
Feedburner
FeedBurner:

Owned by Google, A free service that allows publishers to deliver their content to feeds subscribers via email. Also referred by Rss Feeds. There might be other uses and technicalities involved in FeedBurner but I'm going to explain this with the perspective of bloggers (especially newbies...). So the thing is, whenever you publish a new post, it will be delivered to the users who subscribed your blog via email.
By default the post you published will be delivered complete.

Just noticed on many top Blogs, i.e Mybloggertricks, just wondered, why they are giving highly priority to subscribe by email, "because if you are subscribed to feeds to your own blog, you might noticed that you are delivering complete post"

Things Changed:
Now if you deliver only Post Title with Optional summary of posts, then you can allow the subscriber to visit your site or blog.
the tool we will used is Summary burner.

Summary Burner:
Sometimes you just want to be a tease. Offer a short summary of your hyperlink-free content and direct your subscribers to your Web site for the rest of the story. You can also append an optional "Teaser" message to each content item .http://feedburner.google.com/,

Display only Post title in feedburner email feeds:-
Step-1: Go to Feedburner, and click on feeds for your blogs.
Step-2: At the top menu click on Optimize.
Step-3: At the left bottom, click on Summary Burner
Step-4:
summary burner
Once you arrived to Summary burner page. you can active this services.
Maximum Length:- number of characters you want to be the summary of your posts, It may be Null, and you  can leave it, so that no summary for the post.
Teaser:- Optional text you want to appear in each feeds.
Posted by Unknown at Thursday, February 21, 2013 5 comments Email This BlogThis! Share to X Share to Facebook
Labels: How to Blogger

24 Jan 2013

How To Create Automatic Sitemap For Blogger Blogs

4 Comments so far
Tweet
sitemap for blogger

Create Stylish Sitemap for Blogger

Blogger sitemaps,sometime refers by Table of contents,list of all posts and Archive.
you may have different type of visitors, including power visitors who visit your blog most of the time.
while some just came by searching some post. it's time to convert all type of visitors into readers of your blog.
it's a good practise to make a stylish site map which update automatically, so that user can check everything yet published.
 Preview!!
it is also convenient for the users if they are looking for some post and don't know the exact keyword.
The solution to check all posts and pick up the desire article.
Blogosphere world is growing fast in now a days, every blogger trying their best to get the most out of their readers.
To provide all possible resource to users so that they again visit site. and become reader from a simple visitor.
Despite of all these advantages, there is one cons, which is if you have large amount of posts as well as many labels.
then page become large and decrease loading time of a blog.
For efficiency we advice to have only one label for each post, and no same labels for more than one post of types.

How it works?:
credit to Abu farhan, a web designer especially for blogger platform  created sitemap widget, which reside on Google code server.
the widget is desgined to pick up labels from a blog, and place place posts with label each on them.
there is API which call function to that bunch of codes with customization options.
so that you can desing the way you want.

How to add it in Blogger:
  1. Go to Blogger Dashboard.
  2. select a blog and click on pages.
  3. Create a New page.
  4. At the above Give a Page Title sitemap, other than sitmap name will also work, it's upto you which name you want to give. you may give table of contents or archive or list of all posts.
  5. Now click on Edit Html option near page title.
  6. and paste the below code anywhere you want.

<style type="text/css">
/*Outer Border
------------------*/
#toc{width:99%;margin:5px auto;border:1px solid #2D96DF;
-webkit-box-shadow:4px 4px 8px 2px rgba(0,0,0, 0.2);
-moz-box-shadow:4px 4px 8px 2px rgba(0,0,0, 0.2);
box-shadow:4px 4px 8px 2px rgba(0,0,0, 0.2);}
/*Label Color and Background
------------------*/
.labl{color:#FF5F00;font-weight:bold;margin:0 -5px;padding:1px 0 2px 11px;
background:-moz-linear-gradient(right,#C2EAFE 0%,#055A85 40%);
background:-webkit-gradient(linear,left 10,right 80,color-stop(0.20,#055A85),color-stop(1,#C2EAFE));
border:1px solid #2D96DF;border-radius:4px;-moz-border-radius:4px;
-webkit-border-radius:4px;box-shadow:3px 3px 1px #bbb;
-moz-box-shadow:3px 3px 1px #bbb;-webkit-box-shadow:3px 3px 1px #bbb;display:block;}
.labl a{color:#fff;}
.labl:first-letter{text-transform:uppercase;}
/*Latest Post Info
------------------*/
.new{color:#FF5F00;font-weight:bold;font-style:italic}
/*Post Title List
------------------*/
.postname{font-weight:normal;background:-moz-linear-gradient(right,#C2EAFE 0%,#fff 40%);
background:-webkit-gradient(linear,left 80,right 10,color-stop(0.60,#fff),color-stop(1,#C2EAFE));}
.postname li{border-bottom: #ddd 1px dotted;margin-right:5px}
</style></div>
<div style="text-align: left;">
This is the Sitemap of TrixKing Blog. Here you can find All posts published till now.</div>
<div id="toc">
<script src="http://dvslabs.googlecode.com/files/customizable-TOC.js" type="text/javascript"></script>
<script src="http://trixking.blogspot.com/feeds/posts/default?max-results=9999&amp;alt=json-in-script&amp;callback=loadtoc">
</script><a href="http://TrixKing.blogspot.com">Get sitemap widget</a> 
Now you can check preview of the page to make sure it working fine. Once you find, it working for you. click on Publish.
Posted by Unknown at Thursday, January 24, 2013 4 comments Email This BlogThis! Share to X Share to Facebook
Labels: How to Blogger

5 Jan 2013

How To Get SmS Alerts when Server Down

2 Comments so far
Tweet
Either you are website Admin or Blogger, it is essential to monitor your site, Yes, it is possible,Server that keep your files may down sometimes, fortunately there are free services on the web that notify you when your site down. 
There are sites that provides this services, including site 24/7, Siteuptime and PingDom.
In this post we are going to use Pindom. 
How to get mobile SmS alerts when site Down?:
Follow the below steps.
  1. Go to www.pingdom.com and Click on Free Sign-Up
  2. A small window will pop fill the form with your email address and Password and click Sign up
  3. Now it will redirect to a page where you have to write your details,Fill the form with your first name, last name and Company name.Once you complete Click on Save Changes.
  4. Now fill another form, select your country, Time Zone,Date format and Number format, Once you done Click on Save Changes
  5. Once you clicked on save Changes, Another form where you have to insert your Site Url,Name of Check(could be anything), Tick the Box-->Want to Get alerts 
  6. Last form where you have to insert your email address(to get email alerts) and Your Cell Phone Number(to get SmS alerts). Finally Click on Create check.
All Done! Now whenever your site down you will get alerts to both your email address and Mobile phone.
Posted by Unknown at Saturday, January 05, 2013 2 comments Email This BlogThis! Share to X Share to Facebook
Labels: How to Blogger
Older Posts

Search

Follow on Google+

Blogger

  • Blogger Widgets
  • How to Blogger
  • Tips and Tricks
  • Free internet phone calls

Like Facebook Page

Powered by Blogger.

Total Pageviews

 
Copyright © 2013 TrixKing | How To Blogger . Designed by Kamran Khan | Privacy policy