TrixKing | How To Blogger

Pages

  • Home
  • SEO
  • Softwares
  • Games
  • How-Tos
  • Sitemap
Showing posts with label Blogger Tutorials for Newbies to Blogger. Show all posts

14 Apr 2013

Get Started with New Blogger Template HTML Editor

3 Comments so far
Tweet
Blogger developer team recently redesigned and improved the Template HTML editor, which was very most wanted by the designers and developers of blogger ,
Blogger new template html editor
Especially for the developer and designers of Blogger templates it would be very useful, and they can design blogger template in very less time.
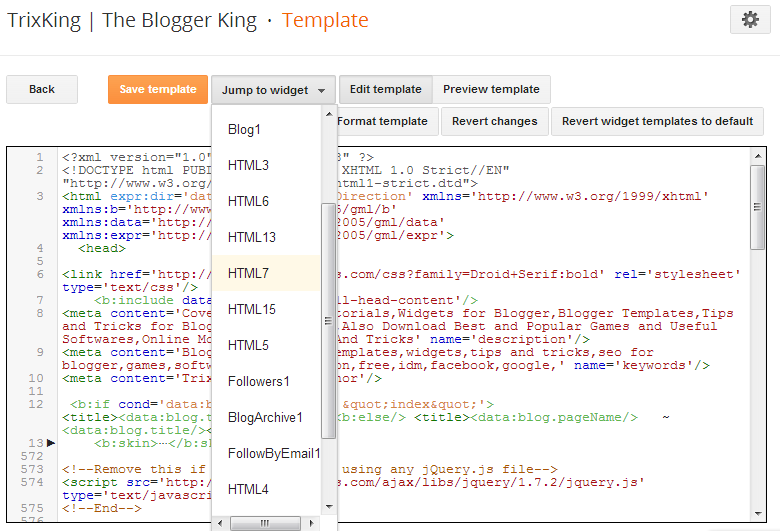
If you are using Blogger platform for blogging and have enough knowledge of HTML, css, JavaScript then you can edit your template and can customize according to your needs and liking.
Unlike the Old traditional blogger template editor the new one is improved,different types of colors are used in the code.
For editing your photos use online photoshop recommended.
Have't checked yet. Check out Now.
1.Go to Blogger Dashboard.
2.Select a a Blog and click on Template.
3. Now Click on Edit html. you will surprise, and will see an awesome look,

 New Blogger template HTML editor features:

Jump to widget Feature:
With the new feature of "Jump to widget", you can easily jump to the set of codes of a specific widget, Jump to widget is drop down button,whenever you click on a specific widget, all codes related to that widget would be highlighted.
Line Numbers:
Line numbers are associated with each line, so it is easy to remind bunch of code you want to edit or you have edited a couple minutes ago, and you have forget something and want to edit again. Unlike the Old template editor in which there were no line numbers, and in the previous version whenever template given you a syntax error, then it was very difficult to find the line number.
Expand a widget:
With the new fold marker ►, you can easily expand a specific set of codes related to a specific tag, these are includable tags which expand when you click on fold marker.
indentations:
if you are a web designer you might used Notepad++, Programmer notepad, or Adobe dream viewer etc, in such advance html editors, there are indentations, which separate a block of code. Now the good news is blogger template also offers such friendly tools, and in future may be there's another feature in which you can see suggestions when you start typing.
Revert widget back to default:
Another feature is "Revert widget to default", whenever you do some mistake while customizing your widget, this feature will be help you to revert back to default,

For photo editor, http://Onlinephotoshop.net the URL of online photoshop.

What are your thoughts?
i think this recent improvement in blogger template editor will help every blogger designer, and you will love it, i personally like the different colors used in template code, indentations, and jump to widget tool, which are very helpful and easier for newbie to blogger template. Leave me a comment and share your views.    
Posted by Unknown at Sunday, April 14, 2013 3 comments Email This BlogThis! Share to X Share to Facebook
Labels: blogger buzz , blogger news , Blogger Tutorials for Newbies to Blogger , How to Blogger

24 Mar 2013

Create Free Professional Contact Us Form for your Website or Blog

Be the first to comment!
Tweet

Contact Us Forms:

Unlike usual in today post i brought a few sites to create a professional contact Us form for your blog or a website, it is easy to build a contact Me or Contact us form and then integrate it into your website page or in blogger or in a WordPress site. all you have to do is to make form and then copy/paste the code into your site.

Why Contact Forms?

Contact forms are very important for a website or a blog, it is a way that users can give you feedback, if there are some problems in your site they can give feedback, and then once you know the problem then it is easy to fix, also users can give suggestions about your site, it may be the design of your website, or how the site should be designed in order to make it pretty much good, and thus more user friendly.
without Feedback's and suggestions you cannot to build a good website, 
Also if you'r site has decent amount of traffic(visitors) and you want to advertise on your site, then it is very good to link empty advertise banner to your contact form, and thus advertiser can contact you.
for any queries users can use contact me form.
also if you allow guest bloggers to write for your blog, then they can talk with you by using contact forms.
There are a lot of sites that offer free scripts for contact forms.
i will recommend you to use foxyform.com . 
Sites that Offers free contact Us forms scripts:
  • Foxyform.com. in this post we will used this site to make a contact form page.
  • FreeContactForm
  • 123contactform.com

How to add contact form to your website or a blog:

First visit Foxyform, Once the website loaded. follow the below instructions.
Settings: there are options you have to select, the options are required fields that you would like to add it to your contact form. these fields must be filled by the user, otherwise an error will pop to the user.
i will recommend you to select name and email as require fields. as they are enough,but you may select more.
Customizing contact form: Here you can customize your contact form, you can select a background color, font color, font family and font size.
Your email address: This is very important step, you must to do it, is to type your email address to which emails would be sent when user submit the form.
At the bottom of the page, you can see the preview of your contact form.
Finally type the captcha code and hit Create formular. Copy the code.

How to Add to Blogger:

  1. Go to Blogger dashboard, then select pages. 
  2. Click on HTML Tab and paste the code.
  3. Click on the preview, it should work for you, 
  4. if it works for you then publish it, Before you publish you may add other text on the form page, so also take advantage of that, have a look to TrixKing Contact page
How to Add to website:
If you are using web hosting to run your site, then it is easy to integrate the code for your contact form page.
simple add a page, or create a new page, type the basic HTML Tags, 
these are .
<html>
          <head>
<title> Contact us</title>
         </head>
        <body>
Your code here
          <body>
<html> 
Paste the contact form page code inside the body tag and save the page, 
Posted by Unknown at Sunday, March 24, 2013 0 comments Email This BlogThis! Share to X Share to Facebook
Labels: Blogger Tutorials for Newbies to Blogger , Blogger Widgets , How to Blogger

7 Dec 2012

Blogger Settings Complete Tutorial To Optimize Blog For Best SEO Performance

9 Comments so far
Tweet

Blogger Blogspot Settings Complete Tutorial And Explanation in Advance:
In this Post we will learn all about blogger settings and their features and how can we use it and get benefit from it.Blogger Settings are also helpful to optimize SEO for Best performance.

Let Start Tour : Login To Your Blogger Account and Click On Settings:
Blogger Settings Basics:
  1. Title: This is the Title of Your Blog.
  2. Description: This is the Description of Your Blog. Give a short details of your Blog. write what will you cover in your Blogging Career
  3. Privacy: Click on Edit. you will see. Add Your Blog to Our Listening : Select "YES", Let Search Engines find your Blog Select "YES".
  4. Publishing(Blog Address): Incase you want to point a custom domain for your Blog then you can use it, Otherwise ignore it.
  5. Permissions(Blog Authors): You can make someone to be your Blog author(Can only write posts,No Access to other sources such as template etc). You can make someone admin(can access everything)
  6. Blog Readers: click On edit and select Anybody. You may choose other option if you want your Blog to be private and no other one can access it.
Blogger Settings: Post And Comments:
  1. Show At Most: How much posts you want to be on the main page of your Blog.
  2. Post Template: Your Specific Text you want to be in post while writing new posts. 
  3. Showcase images with light box: Select Yes so that the images in Your Blog will open in light box,Select No, so that images will open in a new tab.
  4. Comments:Comments Location : How comments appear, either embedded or Full Page Or Pop-up window Or Hide.
  5. Who Can comment?: Anyone? Or Registered users? Users with Google accounts? Only members of this Blog? it's up to you which one you want.
  6. Comment Moderation: Always: Comments must be approved by Admin to be published, Sometimes: have options, Never: Comments published Does not need to be approved by administrator.
  7. Show word Verification: Yes: users must enter captcha code before they publish comments, No: user don't need to enter captcha code.
  8. Comment From message: your Message at the top of comment Box in Blogger.
Blogger Settings: Mobile And Email:
  1. Email: If you want to publish Posts Via Email then You can Use it.
  2. Comments Notification: If you have some friends who are supporting your Blog and you want that they be notified when someone comments in Your Blog. then you can enter their emails.
  3. Email Posts To: When you publish New posts the emails you entered their will receive that posts.
Blogger Settings Search Preferences:
  1. Meta Tags: Description: Use this feature if you want to have different meta tags for every posts.Learn How to Add Meta Tags In Blogger
  2. Error And Redirections: Custom Page Not Found:You can enter here a message which will come when the page in your Blog does not found. click on edit and enter message. Custom Redirects: use this feature if you want to redirect a post or a page to other page or post.
  3. Crawlers and indexing : If you don't know what it means then leave it, it is an advance feature.
Blogger Settings:Other

  1. Blog Tools: Export Blog: Get your all posts data in one xml file. import Blog: you can import your all blog posts if you have all the posts data in xml file. Delete Blog: If you want to delete your blog and all data.
  2. Site Feed: Allow Blog Feed Select YES, Post Feed Redirect URL: Enter Your Feed url, Click Here if you want to create feed for your Blog and Learn More about it
  3. Post Feed footer: Some text or codes you want to be appear at each feed.
  4. Enable Title Links And Enclosure Links:  This adds the title link and enclosure link options in the post editor. Title links allow you to set a custom URL for your post title. Enclosure links are used to make podcasts, MP3s and other content in your posts playable in feeds like RSS and Atom.
  5. OpenID: Your OpenID url:Your OpenID URL can be used to sign in to other OpenID enabled sites. You may also allow OpenID users to post comments on your blog by adjusting your Comment settings.
  6. 5: Select No( i am sure you know about it more than me)
  7. Google Analytics: Analytics Web Property ID: Enter Your Analytics Web property ID,You can find your Google  Analytics Web Property ID Here And Learn More about it Use Your Blogger or Gmail user name and passwords to Sign in.


From The Author: I hope this post will be helpful and useful for you, Incase you want more explanations of a topic in this post then you can comment.
Thank you!
Posted by Unknown at Friday, December 07, 2012 9 comments Email This BlogThis! Share to X Share to Facebook
Labels: Blogger Tutorials for Newbies to Blogger , How to Blogger

5 Dec 2012

Creating Designing And Managing Posts in Blogger Blogspot Blogs

11 Comments so far
Tweet
 Creating Designing And Managing Posts in Blogger Blogspot Blogs
Blogger Tutorials : Creating ,Designing And Managing posts:
In the Previous Tutorials we learnt how to create blog,In this tutorial we will learn about posts and how to customize and Design posts and how to manage it.

How To Create Post in Blogger?:
  1. Login to your Blogger Dashboard
  2. Select a Blog or Click on Create New Post
New Post in blogger
  1. Write Your Post Title at the Top.
  2. And then Write Your Post.
  3. After writing Post You can Save as Draft, incase you want to write next time and don't want to publish
  4. Or You can Publish it, You can also Update next time.
How To Design Post in Blogger?:
Design posts in blogger

Blogger allows you to design post by using tools in blogger,
Now we will discuss these tools.
Blogger Posts Tools
  1. 1.Compose Mode: Write Your Post without coding in html,css
  2. HTML Mode: To Use HTML in order to do some changes and to Customize it.
  3. Undo: To go back,incase you did wrong.
  4. Redo: Revers of Undo,incase you want to go forward
  5. Font-Family: To Select font style.
  6. Fonts-Size: To Select size of Fonts for Post Text, You can select text and apply.
  7. Post-Format: just Like Ms word. Select either Normal,Heading,subheading,Minor heading or to go with normal text.
  8. Bold: To Bold Text. You can also use it by selecting text and apply.
  9. Italic: To Italic text. you can also use it by selecting some text and then apply
  10. Underline: To Underline Text. You can also apply by selecting text.
  11. StrikeThrough: Have a line in center of Text.
  12. Text-Color: Or Fonts color, Select text and apply
  13. Text-Background-color: Background of text.
  14. Link: Links to other external or internal pages. Select some text. Click on Link,a pop will appear, write url where you want to link and user go. you can also check or uncheck new tab. if you check the box then the page will open in new tab, if uncheck then it will open in the same window.
  15. Upload image: To Upload an image or images. You can Drag pictures to adjust.
  16. Upload Video: Upload video to your post. you can also use your youtube videos.
  17. Jump-Break: If you want to crop your post with read more text. you can use it. you can change read more text in blogger layout and then configure posts.
  18. Align Text: To align text either to right or left or center. you can also use it by selecting text and then apply.
  19. Number List: To create a list arranged with numbers
  20. Bullet List: To Create List arranged by bullets.
How To Manage Posts in Blogger?:
There are three ways and places where you can manage your posts. we will discuss it with details.
1.Post Settings: 
While writing post have a look at the right side.
You can label post, can change time and date of published posts,can use permalink for your post,can give location, By using Options button you can revoke users to comment on post and can manage backlinks.
posts settings in blogger
2.How to Configure Posts in Blogger?:
Go to Blogger Layout then click on edit posts.
a window will pop where you can configure posts.
posts settings in blogger
3. Blogger Posts.
Go To Your Blogger Dashboard then Select Posts.Now You can Select some posts and Assign Labels, You can Revert to Drafts.You can Delete posts.


Go Back to Blogger Tutorial Page

From The Author: Dear Friends: i hope this post will help you and will be useful for you.
InCase you want more Or Something i missed. You can Comment. i will try to answer you and will give suggestions.
Posted by Unknown at Wednesday, December 05, 2012 11 comments Email This BlogThis! Share to X Share to Facebook
Labels: Blogger Tutorials for Newbies to Blogger , How to Blogger

5 Jul 2012

Blogger Tutorials To Create Your First Blogger Blogspot Blog

4 Comments so far
Tweet
Blogger Tutorials: Creating your first blog
Creating Blogger Blogspot Blog:
In the Previous Tutorial we learnt how to create gmail account which is necessary to create your blog. in this post we will learn how to create blog.
Video Tutorials is also provided which will help you to create Blogger Blogspot Blog.
So when you Create your Gmail account so then follow the below steps.

How To Create A Free Blog?:

  1. Go To Blogger.com
  2. Login with your Gmail user name and password.
  3. Click On Continue To Blogger
  4. Click on Create A Blog.
  5. Choose Title For Your Blog.
  6. Choose Address For Your Blog.
  7. Select a Template, You can Change it Later.
  8. And Finally click on Create Blog.  
Posted by Unknown at Thursday, July 05, 2012 4 comments Email This BlogThis! Share to X Share to Facebook
Labels: Blogger Tutorials for Newbies to Blogger

Creating Gmail Account To Create Your First Blogger Blogspot Blog

1 Comment so far
Tweet
1.Creating Gmail account:
Now Google allow you to use his all products with only one gmail account.including blogger,youtube,webmaster tools,etc.
If you want to create a Blogspot Blog and to publish your posts,So first you need Gmail account.
Video tutorials is also provided which explain how to create Gmail account.

How To Create Gmail Account Or id:

  1. Go to Gmail.com
  2. Click on create an account
  3. fill the form with your name, password etc.
  4. Finally you created your gmail account

Keep in mind your gmail id is your blogger id too. similarly you can login to youtube,blogger with the same user name and password that you use for your gmail account.

click here to watch this video on youtube


Watch Next Tutorial>

<<Go Back to Blogger Tutorial Page
Posted by Unknown at Thursday, July 05, 2012 1 comments Email This BlogThis! Share to X Share to Facebook
Labels: Blogger Tutorials for Newbies to Blogger
Older Posts

Search

Follow on Google+

Blogger

  • Blogger Widgets
  • How to Blogger
  • Tips and Tricks
  • Free internet phone calls

Like Facebook Page

Powered by Blogger.

Total Pageviews

 
Copyright © 2013 TrixKing | How To Blogger . Designed by Kamran Khan | Privacy policy