TrixKing | How To Blogger

Pages

  • Home
  • SEO
  • Softwares
  • Games
  • How-Tos
  • Sitemap
Showing posts with label Windows7 And 8. Show all posts

31 May 2013

How to Record Video Using Webcam

6 Comments so far
Tweet
There are numerous reasons for which we want to record a video, such as if you want to send a video to your friends, or you want to make a tutorial.
This post will help you to record a video with a webcam (video camera), there are different types of ways to record your webcam on the internet, which we will discuss one by one, the first one will be using a windows movie maker which is not available in windows 8, that's why we will use a software which will record highly quality video with no noise,
Recording video is much easy in windows operating systems than Mac OS and Linux, You may also make a video on YouTube but there is a problem arise, that the video be public, or you cannot to to watch it offline, what you need is a camera connected to your Computer (PC), and windows operating system,
mostly peoples trying to use Skype or Windows live messenger and record their videos, for that reason we've to use screen recording software such as camtasia, camstudio,
for mac users, there are plenty of softwares available, such as QuickTime (available in Mac) and imovie, through which you can get started to make videos using your PC Camera,
 Before you start recording, make sure, that you have connected your camera,and you've plugged in your microphone. there are special softwares for creating videos, which all also add effects to your videos, it is more helpful when you're make tutorials and you want to put some text on the screen, or if you miss something, and you want to add some text on screen, and the user who will watch your tutorials will understand the lessons.

Using Windows Movie Maker:
Windows movie maker icon

This method will work only if you are using windows XP or 7 or Vista.
Step-1: Click on the start menu and then click on all programs and then accessories and there you will find movie maker, or you can run windows movie maker by going to C Drive and then Program files and then find the windows movie maker folder and run the Movie maker.
Step-2: once you opened movie maker, then at the home tab click on webcam video.
recording video using windows movie maker
Step-3:  Now there will be a Red button for starting recording, click on it and the recording will start, when you want to finish the recording, then click on Stop button, a window will pop up which will ask from you the location where  to save the video.
Step-4: The video you have made will appear on the timeline of windows movie maker, you may add themes and effects to your video there by clicking on the thumbnail of your created videos, once you're done.
At the top click on File menu and then click on Save Movie,

For Windows 8 Users:

As windows movie maker is not available in the newest version of windows, for that reason you cannot to record video using windows utility.
Step-1: Download Debut video capture Software and install,during installation setup guide may ask from you to install video editing software( say yes or no).
Step-2: Once you install the software, an icon will be created on your desktop. run the debut video capturing software.
and at the top click on device, debut software will detect your webcam, 
debut video capturing software
Step-3: At the bottom of debut window, click on Red button to start recording, and once you want to finish making video, click on stop button, and your video will be saved to your user directory, inside my videos/debut folder.

Bonus: You can also record your desktop screen using debut capturing software, it is helpful for those users who want to make video tutorials and want to publish on YouTube or burn a DVD from it.
an interesting thing about recording screen using debut software is that you can create video of high quality with minimum size and clear sound quality.

For Mac Users:

if you running mac operating system on your machine, then you can also record video using your web camera.
QuickTime is available in Mac systems.
Step-1: Navigate to QuickTime player, and at the file menu, click on New movie recording,
Step-2: Now click on Record button, and the video capturing will start, when you want to finish recording, then click on stop button.
Finally you can export your video, or save it on your local drives. you can also export to iMovie or iTunes and Web.
Posted by Unknown at Friday, May 31, 2013 6 comments Email This BlogThis! Share to X Share to Facebook
Labels: How To , Windows7 And 8

7 May 2013

How to Change account Picture in Windows 8

2 Comments so far
Tweet

We are still playing with windows 8 basics, so far we have published two simple tricks.
In today post we will learn how to change profile picture in windows 8(the latest release).
In the previous versions of Microsoft windows, there were no linkage between your windows operating system and your Microsoft account that is Hotmail.com or Live.com.
The latest version of windows released by Microsoft have tons of features, including synchronization between your Microsoft account and your windows 8 operating system.
You can use your email address as Microsoft account to sign in to windows, once you done, then you will be able to access your files from anywhere, your photos, and settings.
When you turn on your computer, I suppose you have installed windows 8, then you might noticed, that you have to login into your pc in order to get the start menu screen and use your pc.
If you’re new to the Microsoft windows 8. Then let me explain for you a little.
In the latest windows whenever you are installing your operating system, then you must have to create your account , if you have already Microsoft account, then Microsoft windows will use your Microsoft account as your windows account, if not then you you’ve to create your account, what you need is an email address and some other info.
Once you have successfully installed. Then whenever you start windows, you must to sign in. and there you’ve your account/profile picture. So today post is dedicated to changing your profile/account picture.
For this purpose you don’t need internet connection, you can change manually.
Let start over:
Step-1: Hover your mouse on the top-right corner, in other words bring your mouse to the right top corner of your windows screen. You’ll see a metro sidebar menu,
Step-2:  At the bottom, click on settings, and then click on PC settings.

Step-3: A new window will open, click on personalize at the left side, then click on account picture at the top-right side.
Now you’ll see a browse button, click on it. Windows will bring you to your local hardware files, you can use Go Up to locate your desire picture that you want to use as a profile picture for your windows.
Once you selected, then click on Choose image. Finally you’re done. And your windows account picture was successfully changed and saved.
Bonus Tips:
From the above steps, you can easily change your account picture, but there are two things more that you can do along with your account picture, that is you can change lock screen picture in the personalize Pc Settings, which is the background picture, whenever you turn on your pc but before you sign in to windows, and the second one is the start screen picture, which is the background picture of start screen. Hopefully you like these three basic windows 8 tips and tricks. 
Posted by Unknown at Tuesday, May 07, 2013 2 comments Email This BlogThis! Share to X Share to Facebook
Labels: How To , windows 8 tips and tricks , Windows7 And 8

3 May 2013

How to Turn Off (Shut down) PC in Windows 8

Be the first to comment!
Tweet

This is the series of windows 8 tips and tricks, we have previously discussed how to bring back my computer icon in windows 8.
Unlike previous versions of Microsoft windows operating systems, windows 8 is programmed highly flexible, the hardware resources are used in efficient manner to utilize work experience of users, different types of modules are improved, such as easily find your apps in start screen.
The main improvement is booting, windows 8 boot very fast as compare to other operating systems as well as previous versions of Microsoft windows. And off course you don’t need to wait for a lot of seconds to see windows is successfully shut down, windows 8 shut downing speed is very fast.
Despite of these improvements and a lot of others, some features are changed. That is, where can I find turn off option?
In today post we will learn how to turn off PC in windows 8.  To shut down pc in windows 8 is a bit different from other versions of Microsoft windows, such as in windows XP, vista and windows 7 in which we simply go to start menu, then we shut down PC from there,
But in newer version of Microsoft windows, which is 8, there is no turn off option in the start menu screen, this options is brought to other part of windows 8.

How to turn off windows 8 PC: 

Step-1:  Bring your mouse to the left upper corner of windows, and click on settings.
Step-2: Now at the left bottom, click on power and then click on shut down.
Step-3: all is done, now your windows will prepare to shut down.
Bonus: 
You can always use the above method to turn off your PC  but if you have a bit knowledge of windows, then you might also know some of the shortcuts, such as ALT+F4, which can be used to turn off PC  to restart your PC, to sign out(Only in windows 8), Sleep mode and to switch user.
Posted by Unknown at Friday, May 03, 2013 0 comments Email This BlogThis! Share to X Share to Facebook
Labels: How To , windows 8 tips and tricks , Windows7 And 8

1 May 2013

How to Show My Computer icon on Desktop in Windows 8

3 Comments so far
Tweet
Microsoft have made many changes and improvements in windows 8, if you have newly installed latest Microsoft windows 8, you might noticed that some of the icons are gone, such as computer icon,user files, network and many more.
This post would help you to bring back such important icons on your desktop and to pin to the start metro menu, you will be able to show or hide basic windows icons on your desktop, to facilitate the users, Microsoft have pinned folder icon on the Task bar near internet explorer, from which you can access your local hard drive files, but there are some options that cannot be done without my computer icon, such as if you want to manage your disk managements or you want to view the properties of you PC easily.

Create My Computer icon on Desktop

it is very simple to display computer and other icons on your windows 8 desktop, to be honest, it would be piece of cake for you.

Follow the Below Steps:

Step-1: First of all Right click on Desktop and click personalize. a new window will open, just like below in screen shot.
At the top-left click on Change desktop icons, Now there will be options for you, 
Step-2:
In the 'Desktop icon settings' window check the icons that you want appear on your desktop, these are Computer, Recycle bin, User's Files(Similar to windows xp documents ), Control panel and Network.
Once you check the icons, then click on Apply or Ok.
that's all you need to bring computer icon on your desktop.

Now wait a minute, Do you want My computer icon should appear on your Start Menu? Did't got?
Whenever you start your PC, a New type of metro menu appears, So if you want that computer icon be also there then follow the steps, 

How to Show my computer icon on Start Screen:

Once you followed the above steps to display my computer icon on your desktop, then you are on the right place to make it visible on your windows 8 start screen.
Simply Right click on My Computer and then click on Pin to start. that's all you need, was't that much simple?
Now whenever you will jump to your start screen, you will also see my computer icon.
Posted by Unknown at Wednesday, May 01, 2013 3 comments Email This BlogThis! Share to X Share to Facebook
Labels: How To , windows 8 tips and tricks , Windows7 And 8

28 Apr 2013

How to increase Space on C Drive in Windows Xp/7/Vista/8

4 Comments so far
Tweet
Local Disk
In today post we will learn how to extend the volume of C drive on your local machine without losing your data,because some Programs are necessary to be installed on C drive. 
Such programs are Visual Studio 2012, Microsoft office 2013 etc. in which even if want to install it on other drive such as D or E. Some files must be installed on your c drive. So if you have insufficient space on your c drive, then installation won’t work.
This post will allow you to successfully install such software’s by decreasing space on other drives and using that unallocated space, expand the volume of drive on which windows is installed

How to increase the size of c drive in windows 7:

There are two methods that i will discuss, one is very simple, and one is advance, if the type of your hard drive is basic, then the first one will work fine,but if the type of your drives is dynamic then the first won't work.

Using windows tool:

In this method we are going to increase space on C drive by shrinking other drives such as D,E and extending the c Drive. Let start over:
Step-1. First of all right click on my computer and then click Disk Management. we have to decrease space on other drives such as D, E and then when some space become available, then we will make that space a part of C drive. make sense?
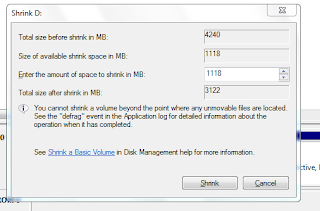
Step-2: Now right click on D or E and then click on Shrink,
Now enter the amount of space in MB to shrink, and click on shrink, wait a few minutes, once the process complete, jump to step no 3.
Step-3: Now right click on C drive and then click on Extend Volume. type amount of space that you want to be a part of your c drive.(Space that you have shrink-ed). wait for a few minutes, once the process completes , you're done!

Using Ease-Us Partition Manager:

If the above method does't work for you. then try this method. In this method we will use a software, called Easeus partition Manager. it is an open source(Free) Software available for home users. 
You will also get the data recovery tool with this software. Download it free .
With this software you can Resize a partition on your drive,Merge two partitions into one and more tools.
Posted by Unknown at Sunday, April 28, 2013 4 comments Email This BlogThis! Share to X Share to Facebook
Labels: How To , Windows7 And 8

30 Jan 2013

How to Use PC using Voice in Windows-7 & 8

Be the first to comment!
Tweet
Use PC using Voice with Windows-7 & 8
Now you can use computer by speech.it's one of the secret windows7 feature.Also available in windows8
Microsoft working on speech recognition  to improve it and to increase the frequency of accuracy.
the benefits of controlling PC with voice is endless. A person can speak twice as fast as a professional typist can type.Even more you can type in ms word using your voice.
it's also enable those peoples who cannot use PC efficiently.
It is possible that computers will be accessed remotely.
Let's turn to our topic and learn how to control PC by voice in windows7.
Let Get Started.

1.Setup microphone

Setup microphone for Speech recognition
First of all click on Start then click on Control panel.
Now click on Speech precognition.
a Small window will pop.
getting started wizard

Plug in microphone. (if you are using Laptop, you may not need to plug in microphone. Dell laptops have built in microphone). Click Next.
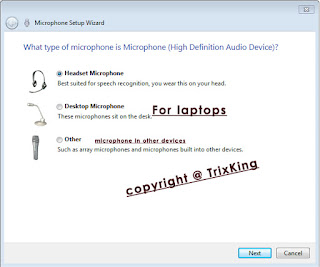
Selecting Best suitable microphone
Now you have three options. Either to use Headset microphone you wear it on your head) Or Desktop micrphone(Micrphone sit on desk) or Other(microphone in other devices.). click on next.

Now you have to read a sentence to make sure your microphone working. speak the sentence and click on next.
Finishing wizard

You are done.Click on finish.

2.Start Speech Recognition:

Once you Setup Microphone then You can Start Speech recognition.
Control computer using your voice
it's that simple:- Click on Start--Control panel -Start Speech Recognition.
Now you can use your PC using your voice.

3.Take Speech Tutorials:

You can Learn how to use your pc with speech and to learn basic commands.
Train your pc to understand you better:
it is not necessary. however you can improve accuracy.
Open the speech reference card: if you have printer and you want to print list of all commands.so that you always know what to say.
From the author: i hope you enjoyed the article. and got a useful feature of windows7. Leave a comment to express you thoughts.
Posted by Unknown at Wednesday, January 30, 2013 0 comments Email This BlogThis! Share to X Share to Facebook
Labels: Windows7 And 8
Older Posts

Search

Follow on Google+

Blogger

  • Blogger Widgets
  • How to Blogger
  • Tips and Tricks
  • Free internet phone calls

Like Facebook Page

Powered by Blogger.

Total Pageviews

 
Copyright © 2013 TrixKing | How To Blogger . Designed by Kamran Khan | Privacy policy